Title of Project: Paper Airplane
Art, Grade 2
identify art elements such as color, texture, form, line, and space and art principles such as emphasis, pattern, and rhythm.[1.B]
create effective compositions, using design elements and principles.[2.B]
identify and practice skills necessary for producing drawings, paintings, prints, constructions, and modeled forms, using a variety of art materials.[2.C]
define reasons for preferences in personal artworks.[4.A]
use prior knowledge and experiences to understand meanings in English.[ELP.1A]
use visual, contextual, and linguistic support to enhance and confirm understanding of increasingly complex and elaborated spoken language.[ELP.2E]
Lesson Content Objective(s):
Students learn about form.Students learn to follow step by step directions
Lesson Language Objective(s):
Resources/materials: Paper, crayons
Instructional Plan:
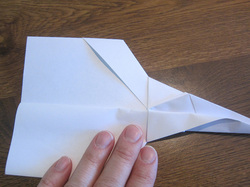
Engage: Discuss what origami is and how it makes shapes without cutting or gluing.
Explore: Talk about aviation and the different ways it has effected art through history.
Explain: 1. Position an 8 ½ - 11 paper long ways.
2. Fold long edge top- bottom 1/2 and open.
3. Hold it long ways so valley crease is top to bottom.
4. Fold bottom right and left edges to meet at valley.
5. Bottom corner fold all the way up to top mid edge.
6. Flip over.
7. Roll top layer from bottom folding at the cut edges of triangles underneath.
8. Turn over bottom to top.
9. Hold left side flat take right folded edge and fold into center crease letting flap of triangle stand out repeat on left side.
10. Hold Left and top of paper and life free edge (note the cone pocket opening as you pull on right edge.
11. Hold top of pocket and flatten cone.
12. Rotate so nose is towards you.
13. Grab right corner twist it so that it travels and the short foiled edge goes in toward the center.
14. Fold long loose edges down into big pocket to secure plane.
15. Flip over and turn so nose is in left hand and inch ½ wing to wing.
16. Fold edge on top grab top wing up and away from you experiment with angles of wings.
17. Repeat and match wings. Make a “y” shape with wings from back.
Elaborate:
Once students have made their airplane they then decorate it.
Assessment:
Evaluate:Students then race their airplanes to see whose can go the farthest.
identify art elements such as color, texture, form, line, and space and art principles such as emphasis, pattern, and rhythm.[1.B]
create effective compositions, using design elements and principles.[2.B]
identify and practice skills necessary for producing drawings, paintings, prints, constructions, and modeled forms, using a variety of art materials.[2.C]
define reasons for preferences in personal artworks.[4.A]
use prior knowledge and experiences to understand meanings in English.[ELP.1A]
use visual, contextual, and linguistic support to enhance and confirm understanding of increasingly complex and elaborated spoken language.[ELP.2E]
Lesson Content Objective(s):
Students learn about form.Students learn to follow step by step directions
Lesson Language Objective(s):
- Students learn about Origami: Art of folded paper, by folding a paper airplane.
Resources/materials: Paper, crayons
Instructional Plan:
Engage: Discuss what origami is and how it makes shapes without cutting or gluing.
Explore: Talk about aviation and the different ways it has effected art through history.
Explain: 1. Position an 8 ½ - 11 paper long ways.
2. Fold long edge top- bottom 1/2 and open.
3. Hold it long ways so valley crease is top to bottom.
4. Fold bottom right and left edges to meet at valley.
5. Bottom corner fold all the way up to top mid edge.
6. Flip over.
7. Roll top layer from bottom folding at the cut edges of triangles underneath.
8. Turn over bottom to top.
9. Hold left side flat take right folded edge and fold into center crease letting flap of triangle stand out repeat on left side.
10. Hold Left and top of paper and life free edge (note the cone pocket opening as you pull on right edge.
11. Hold top of pocket and flatten cone.
12. Rotate so nose is towards you.
13. Grab right corner twist it so that it travels and the short foiled edge goes in toward the center.
14. Fold long loose edges down into big pocket to secure plane.
15. Flip over and turn so nose is in left hand and inch ½ wing to wing.
16. Fold edge on top grab top wing up and away from you experiment with angles of wings.
17. Repeat and match wings. Make a “y” shape with wings from back.
Elaborate:
Once students have made their airplane they then decorate it.
Assessment:
Evaluate:Students then race their airplanes to see whose can go the farthest.
Title of Project: Origami Dog
Art, Grade 2
identify variations in objects and subjects from the environment, using the senses.[1.A]
identify art elements such as color, texture, form, line, and space and art principles such as emphasis, pattern, and rhythm.[1.B]
express ideas and feelings in artworks, using a variety of colors, forms, and lines.[2.A]
identify stories and constructions in a variety of artworks.[3.A]
compare ways individuals and families are depicted in different artworks.[3.B]
identify ideas in original artworks, portfolios, and exhibitions by peers and artists.[4.B]
use prior knowledge and experiences to understand meanings in English.[ELP.1A]
Lesson Content Objective(s):
Resources/materials: Origami Paper, Construction paper, glue, crayons
Instructional Plan:
Engage: Discuss family portraits and origami.
Explore: Talk about the difference between the 2-D and 3-D.
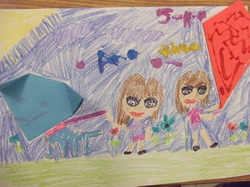
Explain:· Students make an origami dog head and kite. Students glue the dog head & Kite onto a piece of construction paper.
Elaborate:
· Students draw a place for the dog to live in and a family to play with the dog in a park and fly a kit.
· Show a story in their park picture creating word bubbles.
Assessment:
Evaluate: Students tell about their dog and family portrait and reflect about the difference between 2-d and 3-d art.
identify variations in objects and subjects from the environment, using the senses.[1.A]
identify art elements such as color, texture, form, line, and space and art principles such as emphasis, pattern, and rhythm.[1.B]
express ideas and feelings in artworks, using a variety of colors, forms, and lines.[2.A]
identify stories and constructions in a variety of artworks.[3.A]
compare ways individuals and families are depicted in different artworks.[3.B]
identify ideas in original artworks, portfolios, and exhibitions by peers and artists.[4.B]
use prior knowledge and experiences to understand meanings in English.[ELP.1A]
Lesson Content Objective(s):
- Students are able to create an origami Dog.
- Students compare ways individuals and families are depicted in different artworks.
- Origami: Art of folded paper
- Be able to understand origami by creating a dog and kite.
- Be able to tell the difference between 2-D & 3-D by look at the flat parts on their paper & look at the relief origami they created.
Resources/materials: Origami Paper, Construction paper, glue, crayons
Instructional Plan:
Engage: Discuss family portraits and origami.
Explore: Talk about the difference between the 2-D and 3-D.
Explain:· Students make an origami dog head and kite. Students glue the dog head & Kite onto a piece of construction paper.
Elaborate:
· Students draw a place for the dog to live in and a family to play with the dog in a park and fly a kit.
· Show a story in their park picture creating word bubbles.
Assessment:
Evaluate: Students tell about their dog and family portrait and reflect about the difference between 2-d and 3-d art.
Title of Project: Step by Step Superhero
Art, Grade 2
identify variations in objects and subjects from the environment, using the senses.[1.A]
identify art elements such as color, texture, form, line, and space and art principles such as emphasis, pattern, and rhythm.[1.B]
express ideas and feelings in artworks, using a variety of colors, forms, and lines.[2.A]
create effective compositions, using design elements and principles.[2.B]
identify stories and constructions in a variety of artworks.[3.A]
compare ways individuals and families are depicted in different artworks.[3.B]
identify different kinds of jobs in art.[3.C]
identify ideas in original artworks, portfolios, and exhibitions by peers and artists.[4.B]
use prior knowledge and experiences to understand meanings in English.[ELP.1A]
use visual, contextual, and linguistic support to enhance and confirm understanding of increasingly complex and elaborated spoken language.[ELP.2E]
Lesson Content Objective(s):
Students are able to create a composition using balance and contrast.
• Students construct a composition following step by step instructions.
• Students will review shapes and lines.
Students will create a drawing about a superhero showing superpowers.
Lesson Language Objective(s):
Students will be able to know the names of lines and draw the lines to create a variety of shapes.
Students will be able to show a story showing a beginning, middle, and end in their artwork showing a superhero.
Resources/materials: crayons
Instructional Plan:
Engage: Review the art terms balance and contrast.
Explore: Talk about superheroes and show how to drawthem.
Explain: How to create a story using the cartoon cells.
Eleborate:
Give step by step instructions on how to make a Japanese boy super hero.
• Give step by step instructions on how to make a Japanese girl super hero.
• Students create their own superhero picture.
Assessment:
Evaluate: Students show their hero’s picture explaining how they show balance and contrast.
Title of Project: Alphabet Art
 Stuart Davis
Art, Grade 2
identify art elements such as color, texture, form, line, and space and art principles such as emphasis, pattern, and rhythm.[1.B]
express ideas and feelings in artworks, using a variety of colors, forms, and lines.[2.A]
create effective compositions, using design elements and principles.[2.B]
identify different kinds of jobs in art.[3.C]
identify ideas in original artworks, portfolios, and exhibitions by peers and artists.[4.B]
use prior knowledge and experiences to understand meanings in English.[ELP.1A]
use visual, contextual, and linguistic support to enhance and confirm understanding of increasingly complex and elaborated spoken language.[ELP.2E]
Lesson Content Objective(s):
Students learn about Fonts & Typography by creating different letter styles.
Resources/materials: color pencils
Instructional Plan:
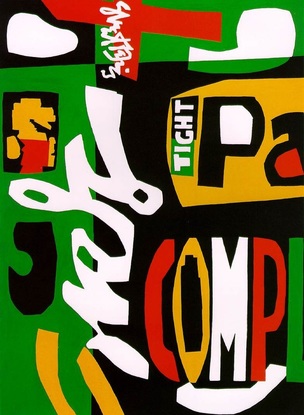
Engage: This project focuses on the elements of line, shape, and color found in numbers and letters as they connect to each other in an abstract design. Young children readily grasp the idea of connecting letters to make designs and produce amazing unique patterns on their own. Good, fresh markers help to ensure quality artwork in this project.
Explore: The art of Stuart Davis (1894-1964) is the springboard for this project. His father was the art editor for the Philadelphia Press and had contracts with many artists who influenced Stuart. Growing up, his own artistic talents were encouraged and at age 19 were critically recognized in an exhibit. At this time there was little interest in Europe’s avant garde (new ideas) but after a visit to Paris, Stuart embraced the modernistic style and philosophies and brought Cubism into American art. He used the forms of his environment, the American city, in his style by creating geometric patterns with intricate flat shapes, numbers, and letters in bright contrasting colors that suggested the zest and rhythm of a billboard, poster, and sign-saturated city life. It was a distinctively American style that reflected the quickened pulse of industrialized America. He was an articulate spokesman for abstract art. He also taught and lectured at several universities and published writings on art theory.
Explain: That the letters should have creative font that repentant them.
Elaborate:
Assessment:
Evaluate: Students discuss their line, shape, and color they added to their abstract letter art.
identify art elements such as color, texture, form, line, and space and art principles such as emphasis, pattern, and rhythm.[1.B]
express ideas and feelings in artworks, using a variety of colors, forms, and lines.[2.A]
create effective compositions, using design elements and principles.[2.B]
identify different kinds of jobs in art.[3.C]
identify ideas in original artworks, portfolios, and exhibitions by peers and artists.[4.B]
use prior knowledge and experiences to understand meanings in English.[ELP.1A]
use visual, contextual, and linguistic support to enhance and confirm understanding of increasingly complex and elaborated spoken language.[ELP.2E]
Lesson Content Objective(s):
- Students learn about thin, thick, slanted, curved and zigzag lines.
- Students learn about movement in art.
- Students learn the art terms line, outline, and movement
- Students learn about artist Stuart Davis
Students learn about Fonts & Typography by creating different letter styles.
Resources/materials: color pencils
Instructional Plan:
Engage: This project focuses on the elements of line, shape, and color found in numbers and letters as they connect to each other in an abstract design. Young children readily grasp the idea of connecting letters to make designs and produce amazing unique patterns on their own. Good, fresh markers help to ensure quality artwork in this project.
Explore: The art of Stuart Davis (1894-1964) is the springboard for this project. His father was the art editor for the Philadelphia Press and had contracts with many artists who influenced Stuart. Growing up, his own artistic talents were encouraged and at age 19 were critically recognized in an exhibit. At this time there was little interest in Europe’s avant garde (new ideas) but after a visit to Paris, Stuart embraced the modernistic style and philosophies and brought Cubism into American art. He used the forms of his environment, the American city, in his style by creating geometric patterns with intricate flat shapes, numbers, and letters in bright contrasting colors that suggested the zest and rhythm of a billboard, poster, and sign-saturated city life. It was a distinctively American style that reflected the quickened pulse of industrialized America. He was an articulate spokesman for abstract art. He also taught and lectured at several universities and published writings on art theory.
Explain: That the letters should have creative font that repentant them.
Elaborate:
- Draw a Large Letter, The First letter of their first name.
- Add more connecting letters of their name.
- Fill the page with letter designs.
- Add color
Assessment:
Evaluate: Students discuss their line, shape, and color they added to their abstract letter art.
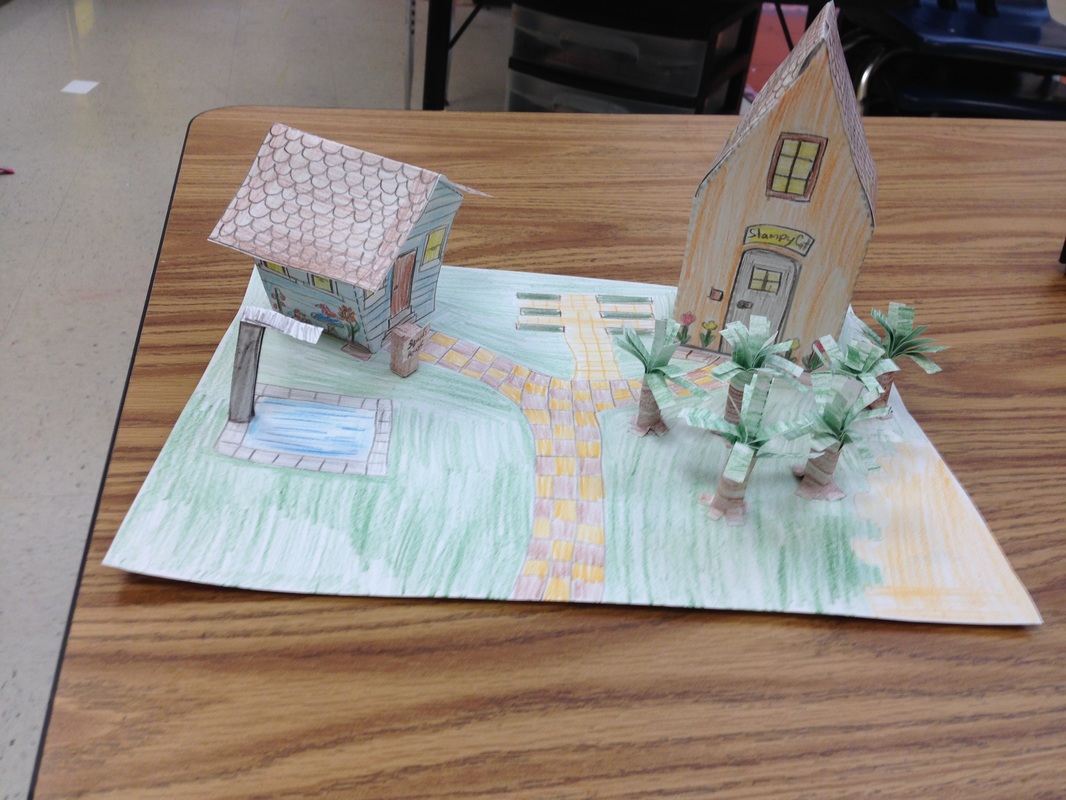
Title of Project: Paper Craft House-Diorama
Art, Grade 2
identify variations in objects and subjects from the environment, using the senses.[1.A]
identify art elements such as color, texture, form, line, and space and art principles such as emphasis, pattern, and rhythm.[1.B]
express ideas and feelings in artworks, using a variety of colors, forms, and lines.[2.A]
create effective compositions, using design elements and principles.[2.B]
identify and practice skills necessary for producing drawings, paintings, prints, constructions, and modeled forms, using a variety of art materials.[2.C]
identify stories and constructions in a variety of artworks.[3.A]
compare ways individuals and families are depicted in different artworks.[3.B]
identify different kinds of jobs in art.[3.C]
define reasons for preferences in personal artworks.[4.A]
use prior knowledge and experiences to understand meanings in English.[ELP.1A]
use visual, contextual, and linguistic support to enhance and confirm understanding of increasingly complex and elaborated spoken language.[ELP.2E]
Lesson Content Objective(s):
Students will be able to outline their hand and cut it out of paper.
Students will be able to make pattern with color.
Students will be able to tell the difference between 2-D and 3-D art.
Resources/materials: A paper templates for houses or castles, color pencils, Bristol board, glue, scissors, model magic, paint
Instructional Plan:
Engage: Discuss the difference between 2-D and 3-D.
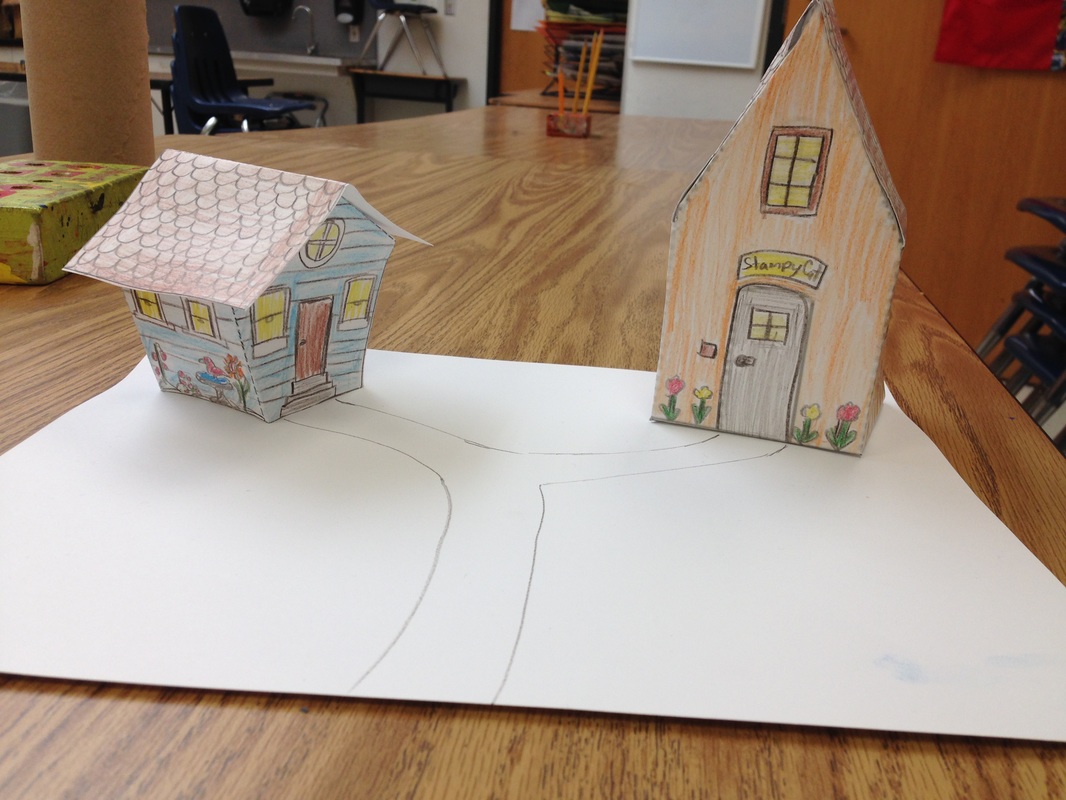
Explore: Watch a video showing paper craft artist Davy & Kristin McGuire the video shows how they use paper craft to create a diorama and how they use light and modern technology. Also discuss youtube artist Stampycat and how he uses minecraft as an art form to create games and building to form a job in art on youtube watch a video where he discuss his channel and talks about how youtube has become his job by just making videos.
Explain: Explain how both these artist use stories to create their artwork and that they are thinking about their characters and setting to develop an entertaining story to capture the eye of their audience.
Elaborate:
· Students pick a house and color it in with color pencils thinking about the architecture. Planning the design of the windows, doors, and roof.
· Students cut out their house and form it into a 3-D form.
· Students then glue their house onto a Bristol board paper. Students then choose if they are going to add more than one house. Then they color in the floor thinking of grass, roads, and water.
· Students than add paper trees.
· Students add characters into their setting with model magic and paint their characters.
Assessment:
Evaluate: Student write about what their story is about in their diorama.
identify variations in objects and subjects from the environment, using the senses.[1.A]
identify art elements such as color, texture, form, line, and space and art principles such as emphasis, pattern, and rhythm.[1.B]
express ideas and feelings in artworks, using a variety of colors, forms, and lines.[2.A]
create effective compositions, using design elements and principles.[2.B]
identify and practice skills necessary for producing drawings, paintings, prints, constructions, and modeled forms, using a variety of art materials.[2.C]
identify stories and constructions in a variety of artworks.[3.A]
compare ways individuals and families are depicted in different artworks.[3.B]
identify different kinds of jobs in art.[3.C]
define reasons for preferences in personal artworks.[4.A]
use prior knowledge and experiences to understand meanings in English.[ELP.1A]
use visual, contextual, and linguistic support to enhance and confirm understanding of increasingly complex and elaborated spoken language.[ELP.2E]
Lesson Content Objective(s):
- Students are able to create a sculptor form depicting a houses and trees.
- Students will learn about form.
- Students will learn about architecture thinking about doors, windows, and roofs.
- Students will learn about how modern artist use paper craft and minecraft to create sculptor forms.
Students will be able to outline their hand and cut it out of paper.
Students will be able to make pattern with color.
Students will be able to tell the difference between 2-D and 3-D art.
Resources/materials: A paper templates for houses or castles, color pencils, Bristol board, glue, scissors, model magic, paint
Instructional Plan:
Engage: Discuss the difference between 2-D and 3-D.
Explore: Watch a video showing paper craft artist Davy & Kristin McGuire the video shows how they use paper craft to create a diorama and how they use light and modern technology. Also discuss youtube artist Stampycat and how he uses minecraft as an art form to create games and building to form a job in art on youtube watch a video where he discuss his channel and talks about how youtube has become his job by just making videos.
Explain: Explain how both these artist use stories to create their artwork and that they are thinking about their characters and setting to develop an entertaining story to capture the eye of their audience.
Elaborate:
· Students pick a house and color it in with color pencils thinking about the architecture. Planning the design of the windows, doors, and roof.
· Students cut out their house and form it into a 3-D form.
· Students then glue their house onto a Bristol board paper. Students then choose if they are going to add more than one house. Then they color in the floor thinking of grass, roads, and water.
· Students than add paper trees.
· Students add characters into their setting with model magic and paint their characters.
Assessment:
Evaluate: Student write about what their story is about in their diorama.
Title of Project: Family Portrait
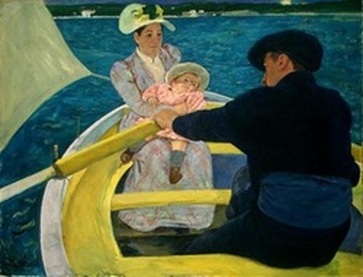 Mary Cassatt, The Boating Party
Lesson Content Objective(s):
Students learn about family portraits by drawing a picture of their family.
Students learn about portraits by drawing a picture of a person.
Resources/materials: Crayons
Instructional Plan:
Engage: Review about portraits and making people not with sticks but with shapes and cloths.
Explore: Students read about puppets a story telling in their second grade book on page 54.
Explain: Discuss how we could create a picture telling a story.
Elaborate:
· Students create a picture of their family.
· Students place their family in one of their happiest memories. For example, like at their birthday party, going swimming, or at Six Flags.
Assessment:
Evaluate: Students write about where did they place their family and why that was their happiest memory.
- Students learn about paintings that tell stories.
- Students learn to make up characters.
- Students learn to vary their pressure on their crayons to create value
- Students learn how to present the artwork to others by telling their stories.
- Students will draw a figure with face, arms, and legs.
Students learn about family portraits by drawing a picture of their family.
Students learn about portraits by drawing a picture of a person.
Resources/materials: Crayons
Instructional Plan:
Engage: Review about portraits and making people not with sticks but with shapes and cloths.
Explore: Students read about puppets a story telling in their second grade book on page 54.
Explain: Discuss how we could create a picture telling a story.
Elaborate:
· Students create a picture of their family.
· Students place their family in one of their happiest memories. For example, like at their birthday party, going swimming, or at Six Flags.
Assessment:
Evaluate: Students write about where did they place their family and why that was their happiest memory.
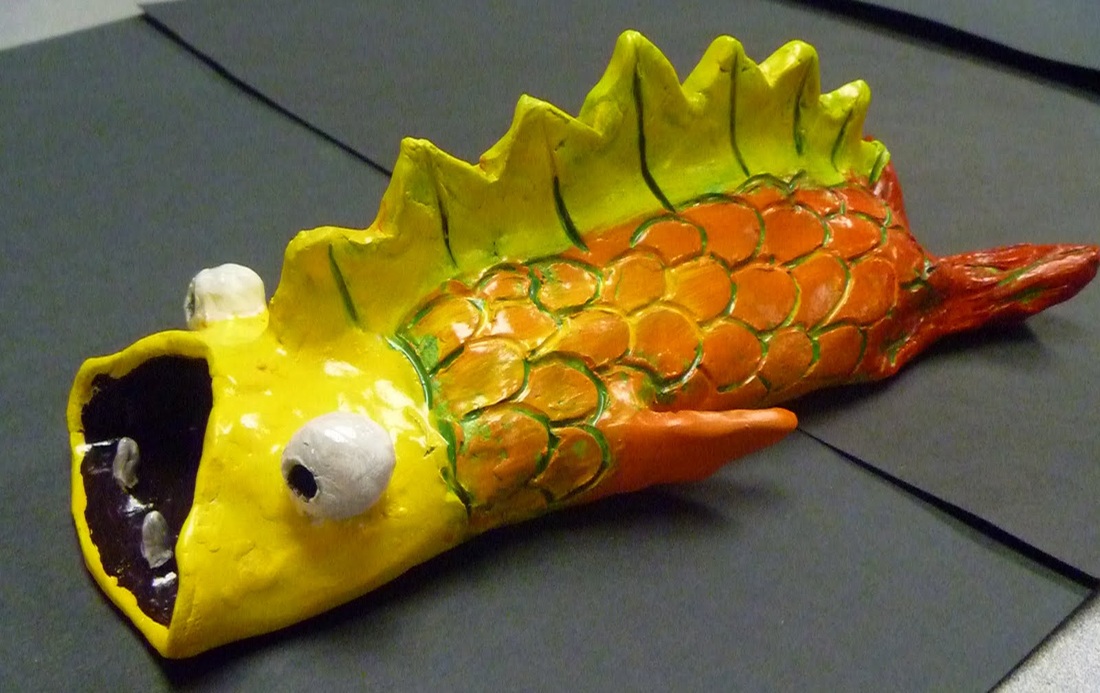
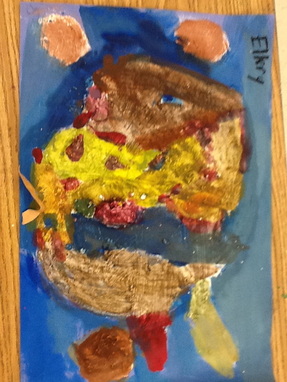
Title of Project: Taco Fish

Art, Grade 2
identify variations in objects and subjects from the environment, using the senses.[1.A]
identify art elements such as color, texture, form, line, and space and art principles such as emphasis, pattern, and rhythm.[1.B]
express ideas and feelings in artworks, using a variety of colors, forms, and lines.[2.A]
create effective compositions, using design elements and principles.[2.B]
identify different kinds of jobs in art.[3.C]
identify ideas in original artworks, portfolios, and exhibitions by peers and artists.[4.B]
use prior knowledge and experiences to understand meanings in English.[ELP.1A]
use visual, contextual, and linguistic support to enhance and confirm understanding of increasingly complex and elaborated spoken language.[ELP.2E]
Lesson Content Objective(s):
Instructional Plan:
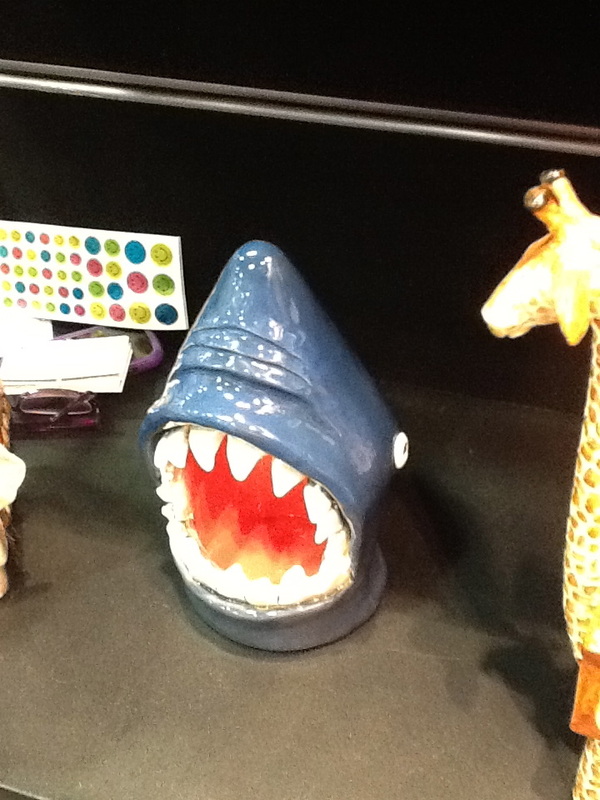
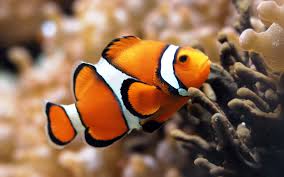
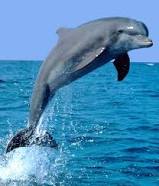
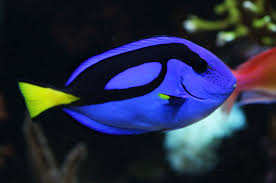
Engage: Discuss different fish in the sea Sharks, dolphins, and clown fish.
Explore: Explore the parts of a fish.
Explain: Explain how to create a taco fish in clay discuss art terms, scoring, press, and smooth.
Eleborate:
· Students make a taco shape.
· Students add details like eye, gills, mouth, arms, legs and tail to form their Fish.
· Second day students paint their fish with Glaze paint. Students create a 2-D picture of a fish underwater.
Assessment:
Evaluate: Student’s show their fish and tell what details they added to their fish. Students discuss the differences between 2-D and 3-D fish.
identify variations in objects and subjects from the environment, using the senses.[1.A]
identify art elements such as color, texture, form, line, and space and art principles such as emphasis, pattern, and rhythm.[1.B]
express ideas and feelings in artworks, using a variety of colors, forms, and lines.[2.A]
create effective compositions, using design elements and principles.[2.B]
identify different kinds of jobs in art.[3.C]
identify ideas in original artworks, portfolios, and exhibitions by peers and artists.[4.B]
use prior knowledge and experiences to understand meanings in English.[ELP.1A]
use visual, contextual, and linguistic support to enhance and confirm understanding of increasingly complex and elaborated spoken language.[ELP.2E]
Lesson Content Objective(s):
- Students learn about geometric and organic forms.
- Students learn about sculpture as a job in art.
- Students learn about carving and shaping forms.
- Students learn about 2-D and 3-D art.
- Students learn sculpting art terms score, press, and smooth.
Instructional Plan:
Engage: Discuss different fish in the sea Sharks, dolphins, and clown fish.
Explore: Explore the parts of a fish.
Explain: Explain how to create a taco fish in clay discuss art terms, scoring, press, and smooth.
Eleborate:
· Students make a taco shape.
· Students add details like eye, gills, mouth, arms, legs and tail to form their Fish.
· Second day students paint their fish with Glaze paint. Students create a 2-D picture of a fish underwater.
Assessment:
Evaluate: Student’s show their fish and tell what details they added to their fish. Students discuss the differences between 2-D and 3-D fish.
Title of Project: Weaving Pablo Picasso Abstract Self-Portrait
 Pablo Picasso
Art, Grade 2
identify variations in objects and subjects from the environment, using the senses.[1.A]
identify art elements such as color, texture, form, line, and space and art principles such as emphasis, pattern, and rhythm.[1.B]
express ideas and feelings in artworks, using a variety of colors, forms, and lines.[2.A]
create effective compositions, using design elements and principles.[2.B]
compare ways individuals and families are depicted in different artworks.[3.B]
identify different kinds of jobs in art.[3.C]
define reasons for preferences in personal artworks.[4.A]
use prior knowledge and experiences to understand meanings in English.[ELP.1A]
use visual, contextual, and linguistic support to enhance and confirm understanding of increasingly complex and elaborated spoken language.[ELP.2E]
Lesson Content Objective(s):
Lesson Language Objective(s):
Resources/materials: cardboard, glue, scissors, construction paper, fabric. Googlie eyes
Instructional Plan:
Engage: Read pages 36-37
Explore: Discuss Pablo Picasso’s abstract art. Discuss relief art and what a self-portrait.
Explain: What weaving is and how to create warp and weft lines. Explain how weaving creates a pattern.
Elaborate: · Hold paper vertically. Fold in half vertically, open and fold again horizontally. Open and fold long edges of paper so that they meet in the middle. Paper is divided into 1/8ths. Fold the top edge down to the center. Draw lines about 1 inch apart and cut to form the loom.
· Demonstrate how to weave the paper strips. Use color strips to create a repeating pattern.
Evaluate: Students show their abstract pictures and discuss how they abstracted it and how it represents them.
identify variations in objects and subjects from the environment, using the senses.[1.A]
identify art elements such as color, texture, form, line, and space and art principles such as emphasis, pattern, and rhythm.[1.B]
express ideas and feelings in artworks, using a variety of colors, forms, and lines.[2.A]
create effective compositions, using design elements and principles.[2.B]
compare ways individuals and families are depicted in different artworks.[3.B]
identify different kinds of jobs in art.[3.C]
define reasons for preferences in personal artworks.[4.A]
use prior knowledge and experiences to understand meanings in English.[ELP.1A]
use visual, contextual, and linguistic support to enhance and confirm understanding of increasingly complex and elaborated spoken language.[ELP.2E]
Lesson Content Objective(s):
- Students review what primary colors and secondary colors.
- Students learn about texture.
- Students learn about relief sculpture.
- Students learn about the artist Pablo Picasso.
- Students learn about abstract art.
- Students review about pattern, texture, and repetition.
- Students learn about weaving.
Lesson Language Objective(s):
- Students learn about warp lines by cutting a 1inch line on the fold line creating a vertical warp line.
- Students learn about weft lines by weaving a horizontal line in and out of the weft lines.
Resources/materials: cardboard, glue, scissors, construction paper, fabric. Googlie eyes
Instructional Plan:
Engage: Read pages 36-37
Explore: Discuss Pablo Picasso’s abstract art. Discuss relief art and what a self-portrait.
Explain: What weaving is and how to create warp and weft lines. Explain how weaving creates a pattern.
Elaborate: · Hold paper vertically. Fold in half vertically, open and fold again horizontally. Open and fold long edges of paper so that they meet in the middle. Paper is divided into 1/8ths. Fold the top edge down to the center. Draw lines about 1 inch apart and cut to form the loom.
· Demonstrate how to weave the paper strips. Use color strips to create a repeating pattern.
- After students have woven the rectangle weaving trim the corners to create an oval for a head.
- Students then layer shapes creating eyes, nose, mouth and hair in a variety of different shapes and textures. Forming at least 2 to 3 layers of shapes.
- Students add aluminum to create a shinny texture in shapes.
Evaluate: Students show their abstract pictures and discuss how they abstracted it and how it represents them.
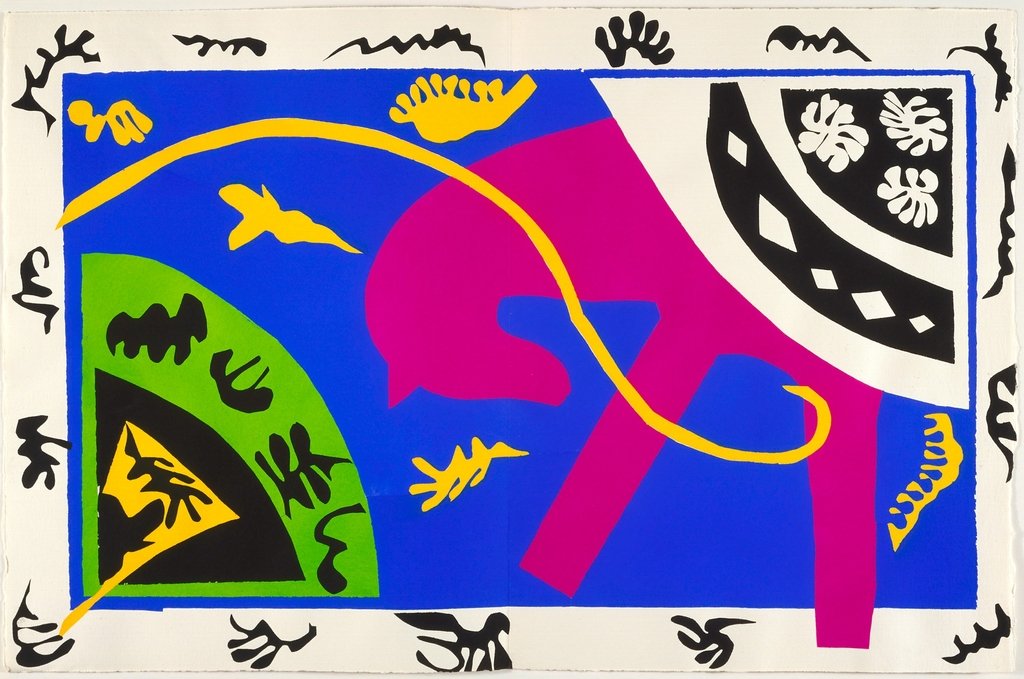
Title of Project: Henri Matisse Organic And Geometric Shape Collage

Art, Grade 2
identify variations in objects and subjects from the environment, using the senses.[1.A]
identify art elements such as color, texture, form, line, and space and art principles such as emphasis, pattern, and rhythm.[1.B]
express ideas and feelings in artworks, using a variety of colors, forms, and lines.[2.A]
create effective compositions, using design elements and principles.[2.B]
identify and practice skills necessary for producing drawings, paintings, prints, constructions, and modeled forms, using a variety of art materials.[2.C]
define reasons for preferences in personal artworks.[4.A]
use prior knowledge and experiences to understand meanings in English.[ELP.1A]
use visual, contextual, and linguistic support to enhance and confirm understanding of increasingly complex and elaborated spoken language.[ELP.2E]
Lesson Content Objective(s):
· Get materials out and put them away without assistance
Students learn about organic and geometric shapes by drawing and cutting them out.
Students learn about the names of lines by cutting them about.
Students learn about texture by feeling the hardness vs. softness of the different mediums they are cutting.
Resources/materials:recycled paper, fabric, craft paper, glue, scissors, glitter.
Instructional Plan:
Engage: Students learn about Henri Matisse and The Dessert Harmony in Red. & his Abstract organic Shape collages.
Explore: Henri Matisse (31 December 1869 – 3 November 1954) was a French artist, known for his use of color and his fluid and original draughtsmanship. He was a draughtsman, printmaker, and sculptor, but is known primarily as a painter. Matisse is commonly regarded, along with Picasso and Marcel Duchamp, as one of the three artists who helped to define the revolutionary developments in the plastic arts in the opening decades of the 20th century, responsible for significant developments in painting and sculpture. Although he was initially labeled a Fauve (wild beast), by the 1920s he was increasingly hailed as an upholder of the classical tradition in French painting. His mastery of the expressive language of color and drawing, displayed in a body of work spanning over a half-century, won him recognition as a leading figure in modern art
Explain: learn about organic and geometric shapes by drawing and cutting them out.
Eleborate:
· Student cut out organic shapes and geometric shapes out of fabric, craft paper, and recycled materials.
· Students also cut out lines in fabric, craft paper, and recycled materials.
· Students arrange their shapes in an abstract design.
Assessment:
Evaluate: Student’s show and tell about their pictures.
identify variations in objects and subjects from the environment, using the senses.[1.A]
identify art elements such as color, texture, form, line, and space and art principles such as emphasis, pattern, and rhythm.[1.B]
express ideas and feelings in artworks, using a variety of colors, forms, and lines.[2.A]
create effective compositions, using design elements and principles.[2.B]
identify and practice skills necessary for producing drawings, paintings, prints, constructions, and modeled forms, using a variety of art materials.[2.C]
define reasons for preferences in personal artworks.[4.A]
use prior knowledge and experiences to understand meanings in English.[ELP.1A]
use visual, contextual, and linguistic support to enhance and confirm understanding of increasingly complex and elaborated spoken language.[ELP.2E]
Lesson Content Objective(s):
- Students learn about pattern and repetition.
- Students learn about collage.
- Students learn how to cut fabric with out frustration.
- Students learn to Use glue bottles correctly
· Get materials out and put them away without assistance
- Identify abstract and realistic art
- Students learn about artist Henri Matisse.
Students learn about organic and geometric shapes by drawing and cutting them out.
Students learn about the names of lines by cutting them about.
Students learn about texture by feeling the hardness vs. softness of the different mediums they are cutting.
Resources/materials:recycled paper, fabric, craft paper, glue, scissors, glitter.
Instructional Plan:
Engage: Students learn about Henri Matisse and The Dessert Harmony in Red. & his Abstract organic Shape collages.
Explore: Henri Matisse (31 December 1869 – 3 November 1954) was a French artist, known for his use of color and his fluid and original draughtsmanship. He was a draughtsman, printmaker, and sculptor, but is known primarily as a painter. Matisse is commonly regarded, along with Picasso and Marcel Duchamp, as one of the three artists who helped to define the revolutionary developments in the plastic arts in the opening decades of the 20th century, responsible for significant developments in painting and sculpture. Although he was initially labeled a Fauve (wild beast), by the 1920s he was increasingly hailed as an upholder of the classical tradition in French painting. His mastery of the expressive language of color and drawing, displayed in a body of work spanning over a half-century, won him recognition as a leading figure in modern art
Explain: learn about organic and geometric shapes by drawing and cutting them out.
Eleborate:
· Student cut out organic shapes and geometric shapes out of fabric, craft paper, and recycled materials.
· Students also cut out lines in fabric, craft paper, and recycled materials.
· Students arrange their shapes in an abstract design.
Assessment:
Evaluate: Student’s show and tell about their pictures.

| adire_eleko__islamic_patterns_2nd_grade.pdf |
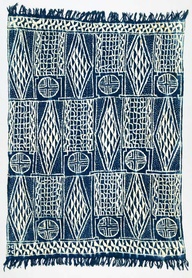
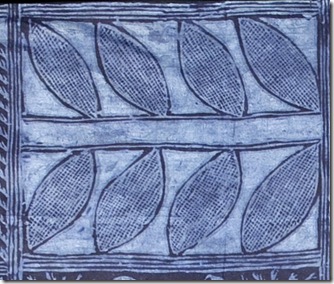
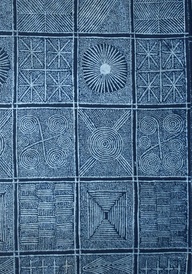
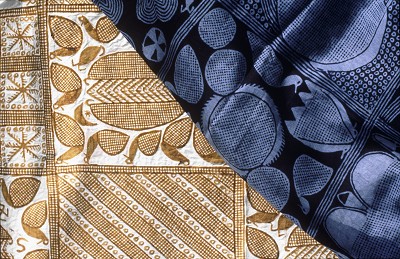
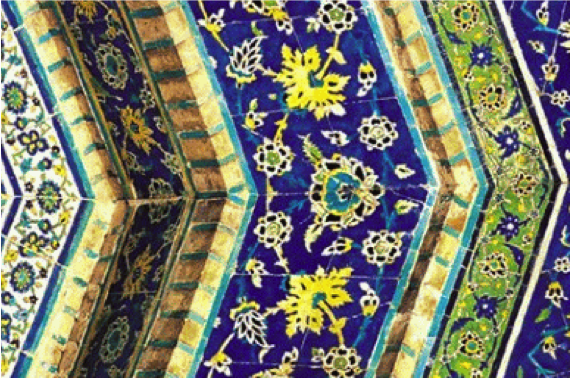
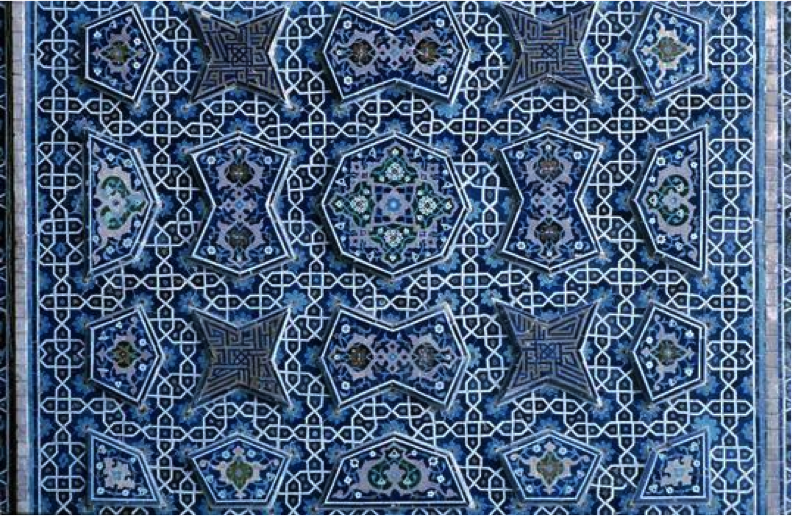
Title of Project: Adire Eleko & Islamic Patterns
Art, Grade 2
identify variations in objects and subjects from the environment, using the senses.[1.A]
identify art elements such as color, texture, form, line, and space and art principles such as emphasis, pattern, and rhythm.[1.B]
express ideas and feelings in artworks, using a variety of colors, forms, and lines.[2.A]
create effective compositions, using design elements and principles.[2.B]
define reasons for preferences in personal artworks.[4.A]
use prior knowledge and experiences to understand meanings in English.[ELP.1A]
use visual, contextual, and linguistic support to enhance and confirm understanding of increasingly complex and elaborated spoken language.[ELP.2E]
identify and practice skills necessary for producing drawings, paintings, prints, constructions, and modeled forms, using a variety of art materials.[2.C]
Lesson Content Objective(s):
Instructional Plan:
Engage: Adire Eleko is the name given to indigo dyed cloth produced by Yoruba women of southwestern Nigeria. A resist, made from cassava starch, is hand painted on cotton cloth that has been marked off into individual squares, then painted with intricate patterns using feathers, palm leaves, or sticks to resist or repel the deep indigo blue dye that is added. Indigo dye, which came from India around the 17th century, is made from the pulp of the indigo plant, mixed with wood ash. Today, good quality Adire can still be found, but it is becoming more rare. Surviving old pieces can be found in museums.
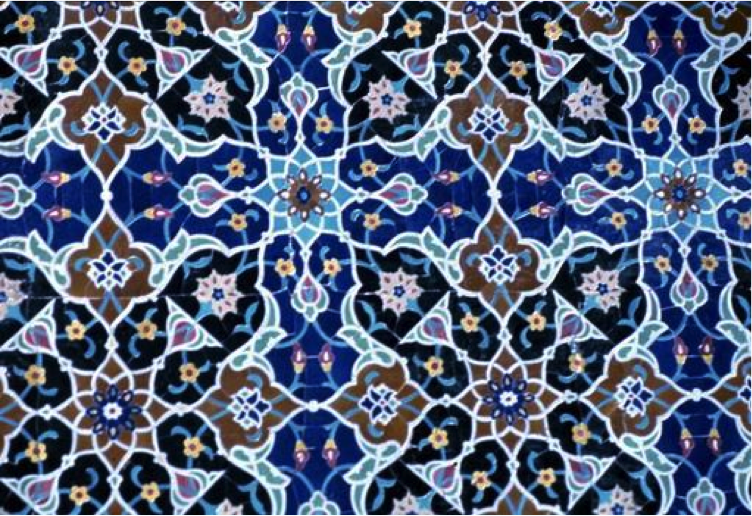
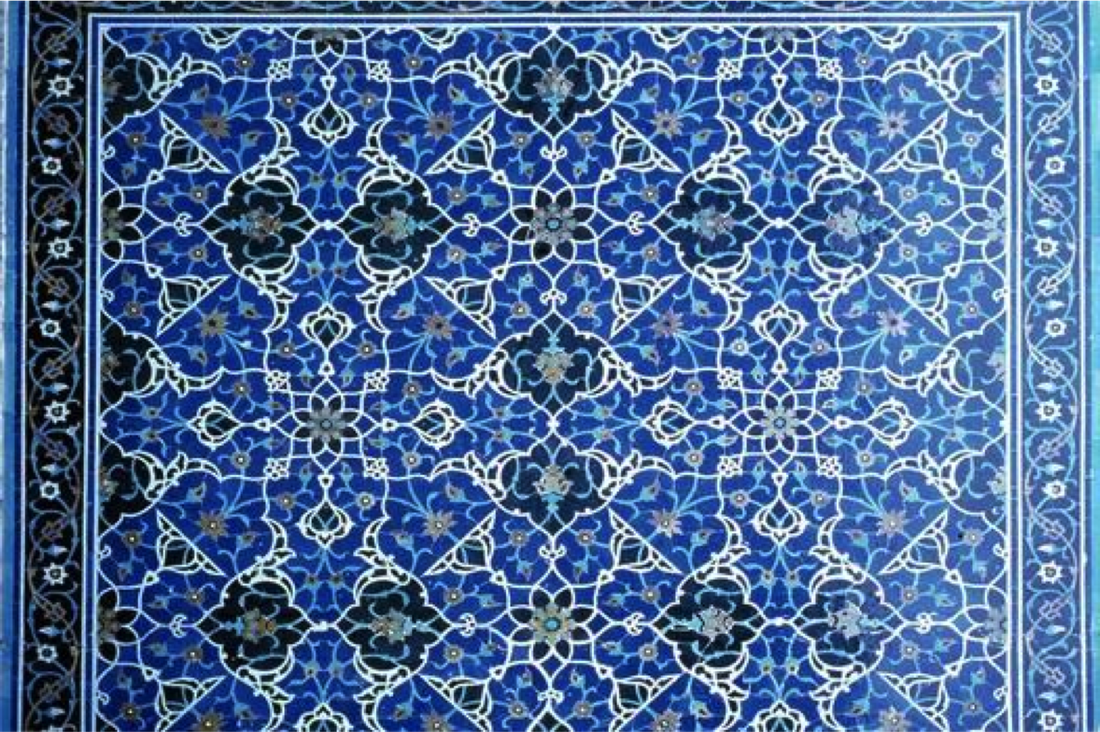
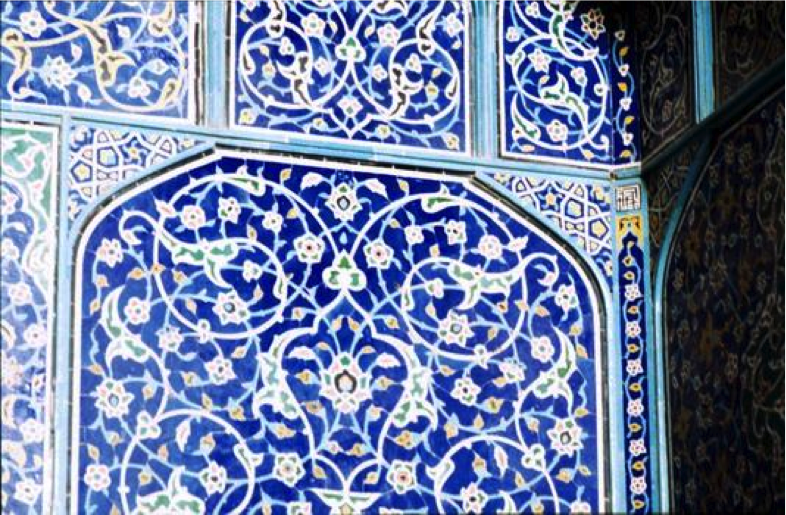
Islamic tiles shown 3 forms
Explain: Explain how to carve a foam plate to create a print.
Eleborate:
Evaluate:Students discuss their design and patterns they created how they balanced the design to form a complete picture.
identify variations in objects and subjects from the environment, using the senses.[1.A]
identify art elements such as color, texture, form, line, and space and art principles such as emphasis, pattern, and rhythm.[1.B]
express ideas and feelings in artworks, using a variety of colors, forms, and lines.[2.A]
create effective compositions, using design elements and principles.[2.B]
define reasons for preferences in personal artworks.[4.A]
use prior knowledge and experiences to understand meanings in English.[ELP.1A]
use visual, contextual, and linguistic support to enhance and confirm understanding of increasingly complex and elaborated spoken language.[ELP.2E]
identify and practice skills necessary for producing drawings, paintings, prints, constructions, and modeled forms, using a variety of art materials.[2.C]
Lesson Content Objective(s):
- Students review about thin, thick, slanted, curved and zigzag lines.
- Students learn symmetrical balance.
- Students compare and contrast two different art styles Adire Eleko patterns or Islamic tile.
- Students learn about rhythm and how it creates movement through patterns in art.
- Students learn about prints by carving a foam plate and stamping it to create a design.
Instructional Plan:
Engage: Adire Eleko is the name given to indigo dyed cloth produced by Yoruba women of southwestern Nigeria. A resist, made from cassava starch, is hand painted on cotton cloth that has been marked off into individual squares, then painted with intricate patterns using feathers, palm leaves, or sticks to resist or repel the deep indigo blue dye that is added. Indigo dye, which came from India around the 17th century, is made from the pulp of the indigo plant, mixed with wood ash. Today, good quality Adire can still be found, but it is becoming more rare. Surviving old pieces can be found in museums.
Islamic tiles shown 3 forms
- Calligraphy: The art of beautiful writing
- Geometric Designs: Express the logic and order of the universe
- Plantlike Patterns
Explain: Explain how to carve a foam plate to create a print.
Eleborate:
- Students choose to create either an Adire Eleko print or an Islamic print.
- Students carve their design into a foam print.
- Students print it 4 times creating a balanced design.
- Students create a border around their prints.
Evaluate:Students discuss their design and patterns they created how they balanced the design to form a complete picture.
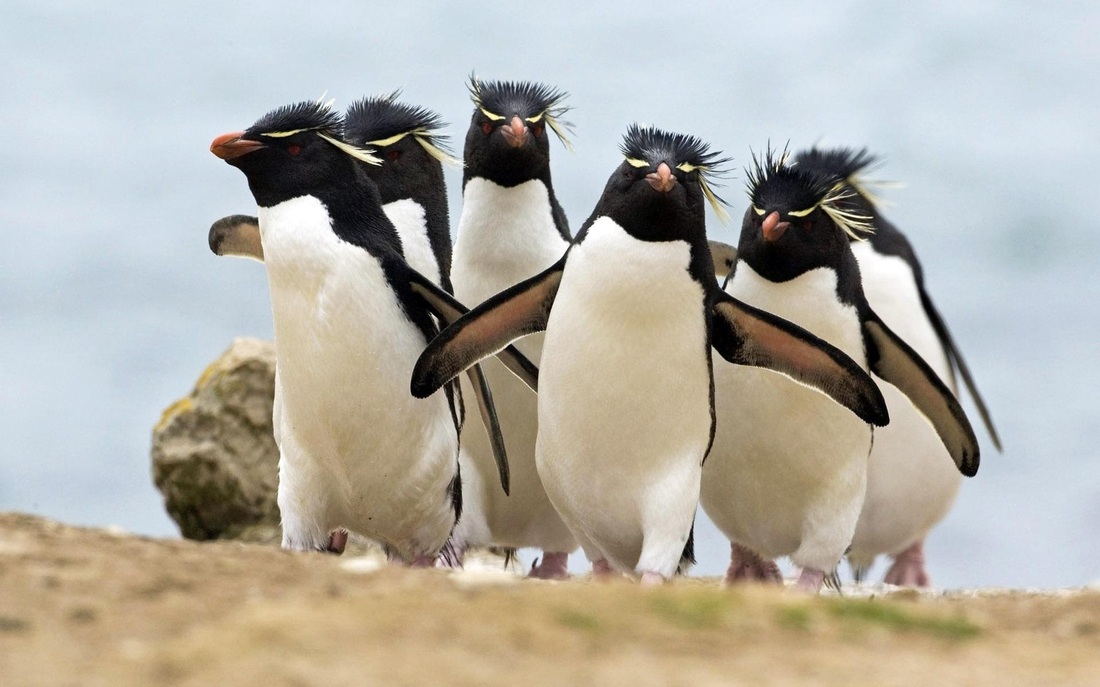
Title of Project: Penguin Collage

Art, Grade 2
identify variations in objects and subjects from the environment, using the senses.[1.A]
identify art elements such as color, texture, form, line, and space and art principles such as emphasis, pattern, and rhythm.[1.B]
express ideas and feelings in artworks, using a variety of colors, forms, and lines.[2.A]
create effective compositions, using design elements and principles.[2.B]
define reasons for preferences in personal artworks.[4.A]
use prior knowledge and experiences to understand meanings in English.[ELP.1A]
use visual, contextual, and linguistic support to enhance and confirm understanding of increasingly complex and elaborated spoken language.[ELP.2E]
Lesson Content Objective(s):
Instructional Plan:
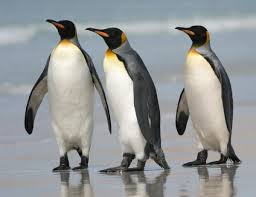
Engage: Read Penguin Pete.
Explore: Talk about the colors and shapes that make up a penguin.
Explain: Describe the difference between 2-dimensional and 3-D dimensional art and the difference between shape and form.
Eleborate:
Evaluate: Students look at their penguins and discuss the shapes and colors it took to make their penguin. Next students discuss the environment they created for their penguin to live in. Students write defining reasons for preferences in personal artworks.
identify variations in objects and subjects from the environment, using the senses.[1.A]
identify art elements such as color, texture, form, line, and space and art principles such as emphasis, pattern, and rhythm.[1.B]
express ideas and feelings in artworks, using a variety of colors, forms, and lines.[2.A]
create effective compositions, using design elements and principles.[2.B]
define reasons for preferences in personal artworks.[4.A]
use prior knowledge and experiences to understand meanings in English.[ELP.1A]
use visual, contextual, and linguistic support to enhance and confirm understanding of increasingly complex and elaborated spoken language.[ELP.2E]
Lesson Content Objective(s):
- Students learn about geometric shapes: circles, ovals, square, triangle, and rectangle
- Students learn about penguins and the shapes and colors that make up the bird.
- Students cut a shape out of scrape paper creating minimal waste.
- Students create objects from nature.
- Students learn about collage by cutting out shapes and glueing to create a bird.
Instructional Plan:
Engage: Read Penguin Pete.
Explore: Talk about the colors and shapes that make up a penguin.
Explain: Describe the difference between 2-dimensional and 3-D dimensional art and the difference between shape and form.
Eleborate:
- Students cut a big black oval for a body.
- Student create black circle for the head.
- Students cut out a white circle for the tummy.
- Students add a triangle folding the paper so it pops out 3-D creating a black beak
- Students add 2 ovals for wings.
- Students add 2 trapezoid black feet.
- Student glue goggle eyes onto their penguins.
- Student adds a cold winter environment around their penguin.
Evaluate: Students look at their penguins and discuss the shapes and colors it took to make their penguin. Next students discuss the environment they created for their penguin to live in. Students write defining reasons for preferences in personal artworks.
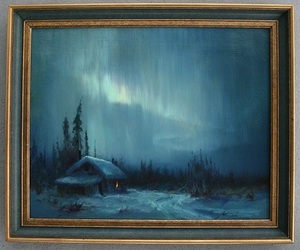
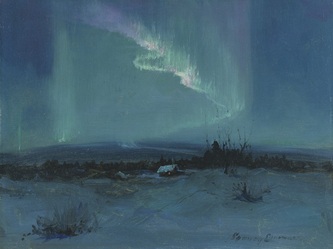
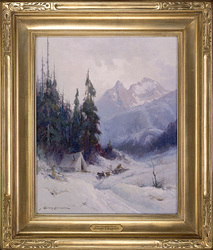
Title of Project: Alaskan Reindeer Landscape
Lesson Content Objective(s):
- Students learn about reindeer and how they’re really called caribou.
- Students learn how to color in neatly.
- Students learn about Alaskan Landscape.
- Students learn about Alaskan Artist Sydney Laurence.
- Students Learn about the Aurora Borealis and how it effects the earth's atmosphere and what it looks like in the sky.
Instructional Plan:
Engage: Discuss Alaska and the Alaskan historic painter Sydney Laurence. Discuss that Alaska seasons are different from ours because during their winter they only have about 2 or 3 hours of day light and then the rest is night sky. Also that during the summer they have full days of daylight and only 2 or 3 hours of night.
Explore:
- The aurora borealis (the Northern Lights) and the aurora australis (the Southern Lights) have always fascinated mankind, and people even travel thousands of miles just to see the brilliant light shows in the earth's atmosphere. The auroras, both surrounding the north magnetic pole (aurora borealis) and south magnetic pole (aurora australis) occur when highly charged electrons from the solar wind interact with elements in the earth's atmosphere.
- Green - oxygen, up to 150 miles in altitude
- Red - oxygen, above 150 miles in altitude
- Blue - nitrogen, up to 60 miles in altitude
- Purple/violet - nitrogen, above 60 miles in altitude
Eleborate:
Students fold their paper in half making a horizon line.
Students draw a reindeer color in as neatly as possible, than add a winter landscape.
Students add some people in their landscape to tell a story.
Students add Aurora Borealis into their sky.
Assessment:
Evaluate: Students show their pictures.
Title of Project:Clay Pattern Rattle
Art, Grade 2
identify art elements such as color, texture, form, line, and space and art principles such as emphasis, pattern, and rhythm.[1.B]
express ideas and feelings in artworks, using a variety of colors, forms, and lines.[2.A]
identify different kinds of jobs in art.[3.C]
define reasons for preferences in personal artworks.[4.A]
create effective compositions, using design elements and principles.[2.B]
use prior knowledge and experiences to understand meanings in English.[ELP.1A]
use visual, contextual, and linguistic support to enhance and confirm understanding of increasingly complex and elaborated spoken language.[ELP.2E]
Lesson Content Objective(s):
Resources/materials: clay, watercolor, clay tools, paintbrushes and water cups
Instructional Plan:
Engage: Discuss how ornamental rattles can be art and are also a musical instrument.
Explore: Read page 86.
Explain: Discuss what a closed form sculpture is and how it is different from and open form.
Eleborate:
Assessment:
Evaluate:
Student’s make their rattle make music and talk about the patterns they made on their clay rattle.
identify art elements such as color, texture, form, line, and space and art principles such as emphasis, pattern, and rhythm.[1.B]
express ideas and feelings in artworks, using a variety of colors, forms, and lines.[2.A]
identify different kinds of jobs in art.[3.C]
define reasons for preferences in personal artworks.[4.A]
create effective compositions, using design elements and principles.[2.B]
use prior knowledge and experiences to understand meanings in English.[ELP.1A]
use visual, contextual, and linguistic support to enhance and confirm understanding of increasingly complex and elaborated spoken language.[ELP.2E]
Lesson Content Objective(s):
- Students learn about geometric and organic forms.
- Students learn about closed form sculptures.
- Students learn about scoring, slip, and additive sculpture.
- Students learn about how musical instruments can be art.
- Students learn about form by creating a sculpture that is not flat.
Resources/materials: clay, watercolor, clay tools, paintbrushes and water cups
Instructional Plan:
Engage: Discuss how ornamental rattles can be art and are also a musical instrument.
Explore: Read page 86.
Explain: Discuss what a closed form sculpture is and how it is different from and open form.
Eleborate:
- Students roll out clay to a ½ inch thick.
- Students choose either ice-cream or Texas.
- Then they make 3 small sphere rattles cover the rattles in paper towels.
- Students place the rattles and paper towels into the clay sandwiching the paper towels into the clay giving it a spherical shape.
- Students then carve their name on one side and draw patterns on the other.
- Student then make a handle for their rattle.
- Day 2: read about patterns and repetition on page 66 & 67.Student’s paint their rattle.
Assessment:
Evaluate:
Student’s make their rattle make music and talk about the patterns they made on their clay rattle.
Title of Project: VincentVan Gogh: Still Life
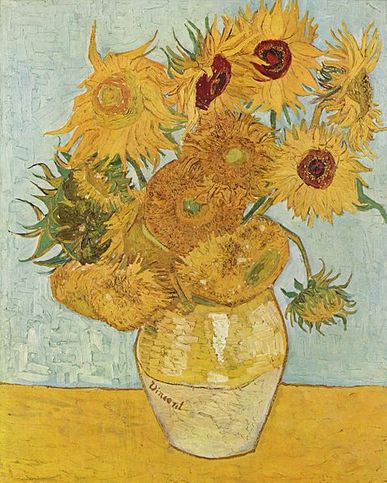 Vincent Van Gogh, Sun Flowers
Lesson Content Objective(s):
Students learn about tints by blending white with a color.Students learn about shades by blending black with a color.
Resources/materials: pastels, glue, color-sand
Instructional Plan:
Engage: Review primary colors, secondary colors, warm, and cool colors.
Explore: Read Camille and the Sunflowers and discuss Vincent Van Gogh’s Sunflowers and discuss how to create value with paint in tints and shades.
Explain: Talk about creating a theme with their picture creates unity by linking everything together.
Eleborate: · Students think about their favorite flowers.
· Draw a vase and Table.
· Students choose whether their picture is going to have a cool or warm color scheme.
· Make tints and shades. Paint many flowers and leaves.
· Outline with glue add color sand.
Assessment:
Evaluate: Students reflect which of their flowers are light and which parts are dark.
- Students review primary colors and secondary colors.
- Students review about warm and cool colors.
- Students learn about value, tints, and shades
- Students focus on coloring in neatly.
- Students review what a still life is in art.
- Students learn about unity.
- Students learn about mixed media.
- Students learn about dominant and submissive colors.
Students learn about tints by blending white with a color.Students learn about shades by blending black with a color.
Resources/materials: pastels, glue, color-sand
Instructional Plan:
Engage: Review primary colors, secondary colors, warm, and cool colors.
Explore: Read Camille and the Sunflowers and discuss Vincent Van Gogh’s Sunflowers and discuss how to create value with paint in tints and shades.
Explain: Talk about creating a theme with their picture creates unity by linking everything together.
Eleborate: · Students think about their favorite flowers.
· Draw a vase and Table.
· Students choose whether their picture is going to have a cool or warm color scheme.
· Make tints and shades. Paint many flowers and leaves.
· Outline with glue add color sand.
Assessment:
Evaluate: Students reflect which of their flowers are light and which parts are dark.
Title of Project: Winslow Homer Seascapes
| winslow_homer.ppt |
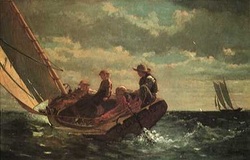 Winslow Homer, A Fair Wind
Art, Grade 2
identify variations in objects and subjects from the environment, using the senses.[1.A]
identify art elements such as color, texture, form, line, and space and art principles such as emphasis, pattern, and rhythm.[1.B]
express ideas and feelings in artworks, using a variety of colors, forms, and lines.[2.A]
create effective compositions, using design elements and principles.[2.B]
identify and practice skills necessary for producing drawings, paintings, prints, constructions, and modeled forms, using a variety of art materials.[2.C]
define reasons for preferences in personal artworks.[4.A]
use prior knowledge and experiences to understand meanings in English.[ELP.1A]
identify stories and constructions in a variety of artworks.[3.A]
identify different kinds of jobs in art.[3.C]
Lesson Content Objective(s):
Students learn what a seascape is by creating a picture of the ocean.Students learn about warm and color schemes by reading about it in the text book and comparing and contrasting pictures of Winslow Homer.
Resources/materials: crayons, paper, watercolor, salt
Instructional Plan:
Engage: Students learn about artist Winslow Homer. Like so many American artists, Winslow Homer had strong New England roots. He was born in Boston, and at the age of six moved with his family to Cambridge. Key transitional years for Homer were 1881-82, which he spent in the fishing village of Cullercoats on the northeast coast of England. Here the painter developed his mature watercolor technique, and here also he found the theme of the sea to which he devoted the rest of his life. Upon his return to the U.S., Homer settled on then-remote Prout's Neck, near Portland, Maine, where his studio overlooked the ocean. His subjects now were masculine ones: fishermen battling the elements both on shore and far out at sea.
Explore: Students read about warm and cool colors on page 48 and 49.
Explain: Review texture, free-form shapes, and landscapes. Discuss seascapes and the different textures and animals they find in the ocean. Also discuss different boats that are used in the ocean. Explain the rules about using watercolors. Talk about how to use dry brush and crayon resist.
Eleborate: Fold paper in half hot dog style making a horizon line. Fill the seascape with watercolor making different textures with dry brush and crayon resists. Students must put a mood or feeling in their seascape by choosing where to make a cool or warm color scheme.
Assessment:
Evaluate: Students show their seascapes and discuss the color scheme they choose to place a mood in their picture.
identify variations in objects and subjects from the environment, using the senses.[1.A]
identify art elements such as color, texture, form, line, and space and art principles such as emphasis, pattern, and rhythm.[1.B]
express ideas and feelings in artworks, using a variety of colors, forms, and lines.[2.A]
create effective compositions, using design elements and principles.[2.B]
identify and practice skills necessary for producing drawings, paintings, prints, constructions, and modeled forms, using a variety of art materials.[2.C]
define reasons for preferences in personal artworks.[4.A]
use prior knowledge and experiences to understand meanings in English.[ELP.1A]
identify stories and constructions in a variety of artworks.[3.A]
identify different kinds of jobs in art.[3.C]
Lesson Content Objective(s):
- Students learn about artist Winslow Homer.
- Students learn about seascapes in art.
- Students also review free-form shapes.
- Students learn about different watercolor techniques like salt texture and wet on wet water color painting
- Students learn about moods in art through cool and warm color schemes
Students learn what a seascape is by creating a picture of the ocean.Students learn about warm and color schemes by reading about it in the text book and comparing and contrasting pictures of Winslow Homer.
Resources/materials: crayons, paper, watercolor, salt
Instructional Plan:
Engage: Students learn about artist Winslow Homer. Like so many American artists, Winslow Homer had strong New England roots. He was born in Boston, and at the age of six moved with his family to Cambridge. Key transitional years for Homer were 1881-82, which he spent in the fishing village of Cullercoats on the northeast coast of England. Here the painter developed his mature watercolor technique, and here also he found the theme of the sea to which he devoted the rest of his life. Upon his return to the U.S., Homer settled on then-remote Prout's Neck, near Portland, Maine, where his studio overlooked the ocean. His subjects now were masculine ones: fishermen battling the elements both on shore and far out at sea.
Explore: Students read about warm and cool colors on page 48 and 49.
Explain: Review texture, free-form shapes, and landscapes. Discuss seascapes and the different textures and animals they find in the ocean. Also discuss different boats that are used in the ocean. Explain the rules about using watercolors. Talk about how to use dry brush and crayon resist.
Eleborate: Fold paper in half hot dog style making a horizon line. Fill the seascape with watercolor making different textures with dry brush and crayon resists. Students must put a mood or feeling in their seascape by choosing where to make a cool or warm color scheme.
Assessment:
Evaluate: Students show their seascapes and discuss the color scheme they choose to place a mood in their picture.
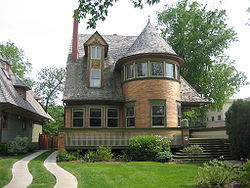
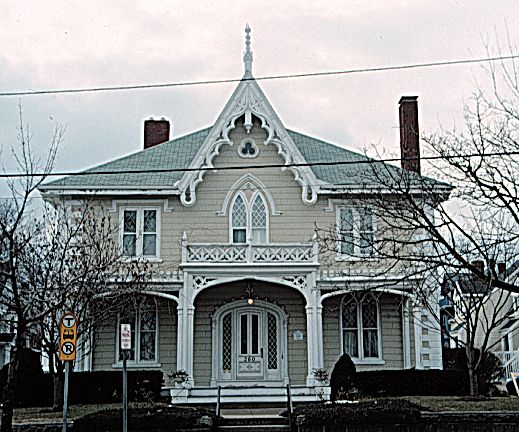
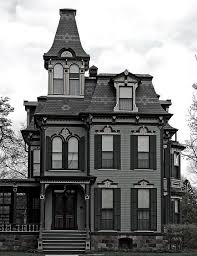
Title of Project: Gothic Architecture and Frank Lloyd Wright
Art, Grade 2
identify variations in objects and subjects from the environment, using the senses.[1.A]
identify art elements such as color, texture, form, line, and space and art principles such as emphasis, pattern, and rhythm.[1.B]
express ideas and feelings in artworks, using a variety of colors, forms, and lines.[2.A]
create effective compositions, using design elements and principles.[2.B]
identify and practice skills necessary for producing drawings, paintings, prints, constructions, and modeled forms, using a variety of art materials.[2.C]
identify stories and constructions in a variety of artworks.[3.A]
identify different kinds of jobs in art.[3.C]
define reasons for preferences in personal artworks.[4.A]
Lesson Content Objective(s):
Instructional Plan:
Engage: Students learn about architecture and a job in art, which is an architect, a person who designs and builds houses.
Explore: Student compare and contrast Frank Lloyd Wrights house with a house with Gothic Architecture.
Explain: Discuss what needs to be on a house; windows, doors, and roof.
Eleborate: 1. Students paint a sunset with yellow, orange, red, blue, and purple.
2. Students add a moon, and stars in the section that is purple.
3. On a black piece of paper students draw their either Gothic house or Frank Lloyd Wright house with white crayon. Students decide whether they want the house to look like a pretty dollhouse or whether it is going to be a spooky scary house.
4. Students add extra environmental elements around their house like; trees, bats, birds, flowers or ghosts.
Assessment:
Evaluate: Student’s show and tell about their pictures.
identify variations in objects and subjects from the environment, using the senses.[1.A]
identify art elements such as color, texture, form, line, and space and art principles such as emphasis, pattern, and rhythm.[1.B]
express ideas and feelings in artworks, using a variety of colors, forms, and lines.[2.A]
create effective compositions, using design elements and principles.[2.B]
identify and practice skills necessary for producing drawings, paintings, prints, constructions, and modeled forms, using a variety of art materials.[2.C]
identify stories and constructions in a variety of artworks.[3.A]
identify different kinds of jobs in art.[3.C]
define reasons for preferences in personal artworks.[4.A]
Lesson Content Objective(s):
- Students learn about pattern and repetition.
- Students learn about artist Frank Lloyd Wright.
- Students learn about architecture.
- Students learn about Gothic Architecture.
- Students learn about Frank Lloyd Wrights house called Walter Gale House.
- Students learn about architecture and what being an architect means by creating a house in a Gothic style.
- Students learn about collage by cutting and gluing.
Instructional Plan:
Engage: Students learn about architecture and a job in art, which is an architect, a person who designs and builds houses.
Explore: Student compare and contrast Frank Lloyd Wrights house with a house with Gothic Architecture.
Explain: Discuss what needs to be on a house; windows, doors, and roof.
Eleborate: 1. Students paint a sunset with yellow, orange, red, blue, and purple.
2. Students add a moon, and stars in the section that is purple.
3. On a black piece of paper students draw their either Gothic house or Frank Lloyd Wright house with white crayon. Students decide whether they want the house to look like a pretty dollhouse or whether it is going to be a spooky scary house.
4. Students add extra environmental elements around their house like; trees, bats, birds, flowers or ghosts.
Assessment:
Evaluate: Student’s show and tell about their pictures.
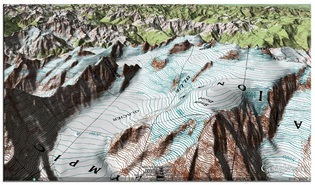
Title of Project: Topography Map
Lesson Content Objective(s):
• Record new learning about landforms and bodies of water in a notebook.
Vocabulary
• plains: large areas of land that are mostly flat
• mountains: the highest land on Earth
• valleys: low areas of land between mountains or hills
• ocean: huge body of salt water
• island: land that is surrounded entirely by water
• rivers: natural moving streams of fresh water that flow across land into lakes, other rivers, or oceans
• lake: a large body of water surrounded by land
• peninsula: land that is surrounded on three sides by water
Artist: Mark Rothko
Instructional Plan:
Engage: Read page 78 about visual textures.
Explore: Discussing artist Mark Rothko and his abstract expressionism – Color Field paintings.
Explain: Show app called Earth Art and discuss how a Topography Map is like a Color Field and how the different colors and textures relate to land formations.
Eleborate:
Evaluate: Students bring their work to their 2nd grade classroom and Students need to record their findings in their notebooks.
· Did you run into any problems when constructing your landform formation?
· Is a different landform part of a system? How?
- Students review about color, and texture.
- Students learn about map making.
- Students learn about Mark Rothko and Color Field.
- Create a model of a new continent with landforms and bodies of water.
- Student’s identify variation in objects and subjects from the environment by being able to feel textures and see the differences in color textures.
- Students learn about visual texture.
• Record new learning about landforms and bodies of water in a notebook.
Vocabulary
• plains: large areas of land that are mostly flat
• mountains: the highest land on Earth
• valleys: low areas of land between mountains or hills
• ocean: huge body of salt water
• island: land that is surrounded entirely by water
• rivers: natural moving streams of fresh water that flow across land into lakes, other rivers, or oceans
• lake: a large body of water surrounded by land
• peninsula: land that is surrounded on three sides by water
Artist: Mark Rothko
- Mark Rothko was an American painter of Latvian Jewish descent. He is generally identified as an Abstract Expressionist, although he himself rejected this label and even resisted classification as an "abstract painter."
- Born: September 25, 1903, Daugavpils, Latvia
- Died: February 25, 1970, New York City, NY
- Periods: Color Field, Abstract expressionism
Instructional Plan:
Engage: Read page 78 about visual textures.
Explore: Discussing artist Mark Rothko and his abstract expressionism – Color Field paintings.
Explain: Show app called Earth Art and discuss how a Topography Map is like a Color Field and how the different colors and textures relate to land formations.
Eleborate:
- Students create mountains, valleys, and lakes with model magic craft foam.
- Students textures plaster natural sponges and brushes to create plains, valleys, islands, and peninsula.
- Students paint all the land formations green, white, brown, tan, red, purple.
- Students paint all the water differents shades of blue and white.
Evaluate: Students bring their work to their 2nd grade classroom and Students need to record their findings in their notebooks.
· Did you run into any problems when constructing your landform formation?
· Is a different landform part of a system? How?
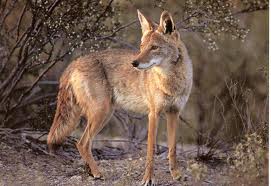
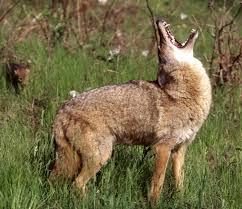
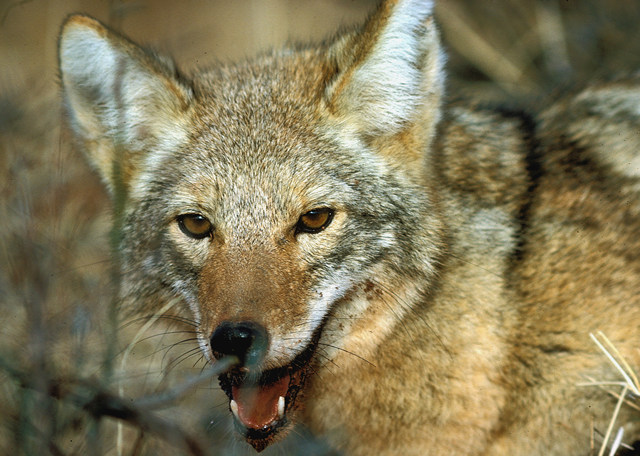
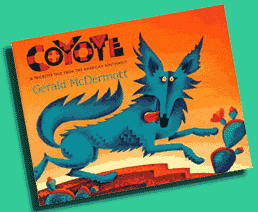
Blue Coyote
Perception: 2.1A Identify variations in objects and subjects from the environment, using the senses. 2.1B Identify art elements such as color, texture, form, line and space and art principles such as emphasis, pattern and rhythm. Creative Expression/Performance: 2.2A Express Ideas and feelings in artworks, using a variety of colors, forms and lines. 2.2B Create effective compositions, using design elements and principles. 2.2C Identify and practice skills necessary for producing drawings, paintings, prints, constructions and modeled forms, using a variety of art materials. Historical/Cultural Heritage: 2.3A Identify stories and constructions in a variety of artwork 2.3B Compare ways individuals and families are depicted in different artworks. 2.3C Identify different jobs in art. Response/Evaluation: 2.4A Define reasons for preferences in personal artworks. 2.4B Identify ideas in original artworks, portfolios, and exhibitions by peers and artists. Materials: tempera paint, paint brushes, paper, and water cups, crayons
Content Objective:
Students will create a landscape with a coyote based on the book Coyote by Gerald McDermolt.
Activities:
Introduction:
Read Coyote by Gerald McDermolt. Discuss how a book illustrator is a job in art and who the artist Gerald McDermolt is and he creates artwork based on Native American art. Discuss how his art tells a story.
Project:
Content Objective:
- Students review primary colors and secondary colors.
- Students review about warm and cool colors.
- Students learn about value, tints, and shades
- Explore how to use tempera paint and how to use paint brush coloring in neatly.
- Students review what a landscape and a horizon line is in a picture.
- Students learn about artist Gerald McDermolt.
- Illustrator: an artist who creates pictures for storybooks.
- Students learn about how to create a landscape using a horizon line.
- Students learn about geometric and organic shapes.
Students will create a landscape with a coyote based on the book Coyote by Gerald McDermolt.
Activities:
Introduction:
Read Coyote by Gerald McDermolt. Discuss how a book illustrator is a job in art and who the artist Gerald McDermolt is and he creates artwork based on Native American art. Discuss how his art tells a story.
Project:
- Create a horizon line, a horizontal line where land meets the sky.
- Create a coyote using geometric shapes.
- Add something that happened to the coyote in the story.
- Color in neatly.
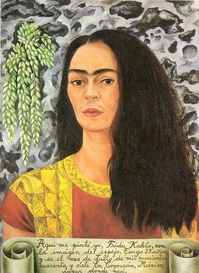
Title of Project: Frida Kahlo’s Self – Portrait
Art, Grade 2
identify art elements such as color, texture, form, line, and space and art principles such as emphasis, pattern, and rhythm.[1.B]
express ideas and feelings in artworks, using a variety of colors, forms, and lines.[2.A]
create effective compositions, using design elements and principles.[2.B]
identify and practice skills necessary for producing drawings, paintings, prints, constructions, and modeled forms, using a variety of art materials.[2.C]
compare ways individuals and families are depicted in different artworks.[3.B]
identify ideas in original artworks, portfolios, and exhibitions by peers and artists.[4.B]
use prior knowledge and experiences to understand meanings in English.[ELP.1A]
use visual, contextual, and linguistic support to enhance and confirm understanding of increasingly complex and elaborated spoken language.[ELP.2E]
Lesson Content Objective(s):
Students learn that a portrait is a picture of a person by creating a picture of themselves.
Vocabulary Objective:
Portraits: a painting, drawing, photograph, or engraving of a person
Balance: a condition in which different elements are equal or in the correct proportions
Symmetrical balance: same on both sides
Resources/materials: pencil, color-pencils, watercolors, brushes, and water cups.
Instructional Plan:
Engage: Read pages 116-117
Explore: Discuss self-portraits and the artist Frida Kahlo.
Explain: Then compare and contrast them with family portraits. . Discuss how to draw a self-portrait. Review the art terms balance and contrast.
Second Day: Review Portraits read 38-39 discussing Family and Self-Portraits.
Eleborate:
Evaluate: Students explain how they created balance and contrast in their picture. Students discuss the things in their picture that they have placed to tell a story about them. Students reflect on how their family portrait is different then their self portrait.
identify art elements such as color, texture, form, line, and space and art principles such as emphasis, pattern, and rhythm.[1.B]
express ideas and feelings in artworks, using a variety of colors, forms, and lines.[2.A]
create effective compositions, using design elements and principles.[2.B]
identify and practice skills necessary for producing drawings, paintings, prints, constructions, and modeled forms, using a variety of art materials.[2.C]
compare ways individuals and families are depicted in different artworks.[3.B]
identify ideas in original artworks, portfolios, and exhibitions by peers and artists.[4.B]
use prior knowledge and experiences to understand meanings in English.[ELP.1A]
use visual, contextual, and linguistic support to enhance and confirm understanding of increasingly complex and elaborated spoken language.[ELP.2E]
Lesson Content Objective(s):
- Students are able to create a composition using balance and contrast.
- Students construct a composition that tells a story about them.
- Compare how Family portrait are different from self portraits.
- Students learn about the Mexican artist Frida Kahlo.
- Students learn about facial proportions.
Students learn that a portrait is a picture of a person by creating a picture of themselves.
Vocabulary Objective:
Portraits: a painting, drawing, photograph, or engraving of a person
Balance: a condition in which different elements are equal or in the correct proportions
Symmetrical balance: same on both sides
Resources/materials: pencil, color-pencils, watercolors, brushes, and water cups.
Instructional Plan:
Engage: Read pages 116-117
Explore: Discuss self-portraits and the artist Frida Kahlo.
Explain: Then compare and contrast them with family portraits. . Discuss how to draw a self-portrait. Review the art terms balance and contrast.
Second Day: Review Portraits read 38-39 discussing Family and Self-Portraits.
Eleborate:
- Students draw a portrait of themselves.
- Then color the background so that it shows balance and contrast with objects that represent them in a border around their picture.
- Second Day: Students finish their self-portrait. Students create frame that reflects their family and has balance and contrast.
Evaluate: Students explain how they created balance and contrast in their picture. Students discuss the things in their picture that they have placed to tell a story about them. Students reflect on how their family portrait is different then their self portrait.
Title of Project: Dot / Piet Mondrian
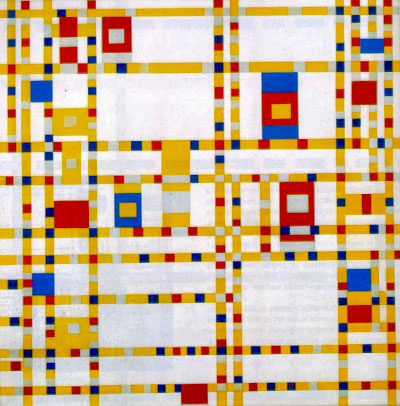

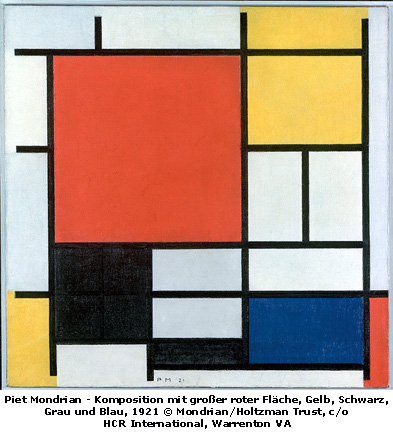
Art, Grade 2
identify art elements such as color, texture, form, line, and space and art principles such as emphasis, pattern, and rhythm.[1.B]
create effective compositions, using design elements and principles.[2.B]
identify ideas in original artworks, portfolios, and exhibitions by peers and artists.[4.B]
use prior knowledge and experiences to understand meanings in English.[ELP.1A]
use visual, contextual, and linguistic support to enhance and confirm understanding of increasingly complex and elaborated spoken language.[ELP.2E]
Lesson Content Objective(s):
Lesson Language Objective(s):
Students will learn about line, shape, and color by creating rectangle and squares.
Vocabulary:
Resources/materials: pencils, crayons, and texture plates, watercolors, water, paint brush
Instructional Plan:
Engage: Show students how to enter the room. Explain classroom procedures.
Explore: Read “The Dot” by Peter Reynolds. Talk about how respect yourself first is a big part of creating artwork. Talk about our art theme, “What inspires an artist?”; Discuss different things that might inspire someone to create art and how it makes a person feel.
Explain:
Eleborate:
Assessment:
Evaluate: · Community circle game students share something about their picture.
· Demonstrate how to line up.
identify art elements such as color, texture, form, line, and space and art principles such as emphasis, pattern, and rhythm.[1.B]
create effective compositions, using design elements and principles.[2.B]
identify ideas in original artworks, portfolios, and exhibitions by peers and artists.[4.B]
use prior knowledge and experiences to understand meanings in English.[ELP.1A]
use visual, contextual, and linguistic support to enhance and confirm understanding of increasingly complex and elaborated spoken language.[ELP.2E]
Lesson Content Objective(s):
- Students will be able to know art classroom procedures.
- Students will about clean up procedures.
- Students will understand classroom expectations.
- Students learn how to share crayons showing mutual respect.
Lesson Language Objective(s):
Students will learn about line, shape, and color by creating rectangle and squares.
Vocabulary:
- Variety: the interesting effect created when one element is different from other elements in an artwork.
- Rhythm: the visual beat created by the regular repetition of elements in an artwork.
- Lines- Marks that go from one point to another and that can be thin, thick, straight, curved, or zigzag.
- De Stijl: was posited on the fundamental principle of the geometry of the straight line, the square, and the rectangle, combined with a strong asymmetricality; the predominant use of pure primary colors with black and white; and the relationship between positive and negative elements in an arrangement of non-objective forms and lines
Resources/materials: pencils, crayons, and texture plates, watercolors, water, paint brush
Instructional Plan:
Engage: Show students how to enter the room. Explain classroom procedures.
Explore: Read “The Dot” by Peter Reynolds. Talk about how respect yourself first is a big part of creating artwork. Talk about our art theme, “What inspires an artist?”; Discuss different things that might inspire someone to create art and how it makes a person feel.
Explain:
- Students Go over the four expectations of Ideal Classroom using:
- Mutual Respect: (Respect yourself, others, and propriety at all times.)
- Active Listening: (Criss-cross applesauce, voices off, eyes forward.)
- No Put Downs: (Complement others.)
- Right to Pass: (To choose to share in community circle.)
Eleborate:
- Using a ruler students will create squares and rectangles on their paper.
- Students will then color in their picture trying to stay in their lines make a picture similar to Piet Mondrian.
Assessment:
Evaluate: · Community circle game students share something about their picture.
· Demonstrate how to line up.
