Weaving Hot Air Balloon
|
|
Materials: paper, weaving strips, scissors, glue, crayons, Watercolors
Content Objective:
I can about pattern, texture, and repetition.
I can learn about weaving.
I can learn about functional art.
I can learn rhythm by creating repetition with weaving.
Language Objective:
I will learn weaving.
I will learn about warp lines by cutting a one-inch line on the fold line creating a vertical warp line.
I will learn about weft lines by weaving a horizontal line in and out of the weft lines.
Instructional Plan:
Day 1 of 4
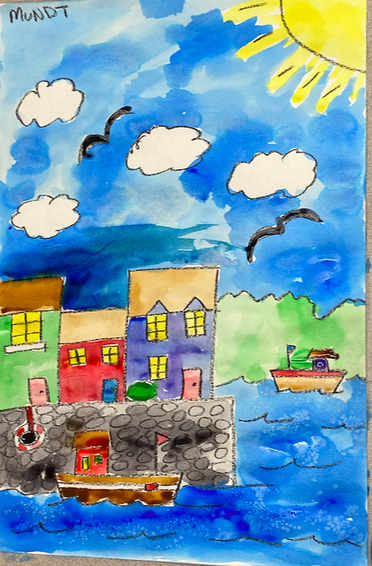
Engage: Learn about texture song. Create a city showing rhythm.
Explore: Talk about background for our hot air balloons. Using crayons and watercolors students create a cityscape for their hot air balloons to fly over using plenty of sky. Part one video:
Explain: Go step by step drawing cityscape by the sea.
Day 2 of 4
Engage: Quiz on Texture. Watch a video about rhythm.
Discuss watercolor techniques. Part two video Play at 7:29
Explore: Talk about how we are going to add them into their hot air balloon how we are going to use a green screen.
Explain: Student's outline pencil lines with crayon and students watercolor their picture.
Day 3 of 4
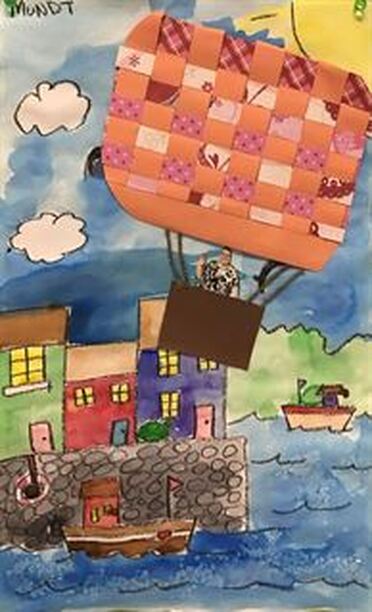
Engage: Talk Weaving what a warp and weft is and how to create it into a hot air balloon. Click the how to link:
Explore: Review the word rhythm and how it occurs in weaving.
Explain: Discuss weaving. Students learn about weft and warp means in weaving. Explore images of hot air balloon and discuss what they are. Talk about the hot air balloon that they see over McKinney. Explain how to create a Warp and Weft out of paper to create their weaving.
Elaborate:
1. Student’s fold paper in half creating one-inch vertical lines. On the open-end students create a one-inch horizontal stop line. Students cut one-inch vertical slits into the paper to form a warp.
2. Student’s weave one-inch strips horizontally though the paper creating a checkerboard design.
3. Once students finish weaving they glue the ends and trim the corners of their rectangle to create an oval design. Students can add detail with markers to their balloon.
4.Once students have an oval woven shape they have the balloon of their hot air balloon.
5.Students then add a basket and a photo of themselves as the person in the basket and glue on strings to make it look as though the balloon is attached to the basket.
Day 4 of 4
Engaged: Take a quiz on rhythm.
Explore: Review coloring in neatly with tempera cakes.
Explain: Students finish painting their background.
Elaborate:
Students add their hot air balloon create 4 strings holding the basket show how to add their photo into the basket.
Content Objective:
I can about pattern, texture, and repetition.
I can learn about weaving.
I can learn about functional art.
I can learn rhythm by creating repetition with weaving.
Language Objective:
I will learn weaving.
I will learn about warp lines by cutting a one-inch line on the fold line creating a vertical warp line.
I will learn about weft lines by weaving a horizontal line in and out of the weft lines.
Instructional Plan:
Day 1 of 4
Engage: Learn about texture song. Create a city showing rhythm.
Explore: Talk about background for our hot air balloons. Using crayons and watercolors students create a cityscape for their hot air balloons to fly over using plenty of sky. Part one video:
Explain: Go step by step drawing cityscape by the sea.
Day 2 of 4
Engage: Quiz on Texture. Watch a video about rhythm.
Discuss watercolor techniques. Part two video Play at 7:29
Explore: Talk about how we are going to add them into their hot air balloon how we are going to use a green screen.
Explain: Student's outline pencil lines with crayon and students watercolor their picture.
Day 3 of 4
Engage: Talk Weaving what a warp and weft is and how to create it into a hot air balloon. Click the how to link:
Explore: Review the word rhythm and how it occurs in weaving.
Explain: Discuss weaving. Students learn about weft and warp means in weaving. Explore images of hot air balloon and discuss what they are. Talk about the hot air balloon that they see over McKinney. Explain how to create a Warp and Weft out of paper to create their weaving.
Elaborate:
1. Student’s fold paper in half creating one-inch vertical lines. On the open-end students create a one-inch horizontal stop line. Students cut one-inch vertical slits into the paper to form a warp.
2. Student’s weave one-inch strips horizontally though the paper creating a checkerboard design.
3. Once students finish weaving they glue the ends and trim the corners of their rectangle to create an oval design. Students can add detail with markers to their balloon.
4.Once students have an oval woven shape they have the balloon of their hot air balloon.
5.Students then add a basket and a photo of themselves as the person in the basket and glue on strings to make it look as though the balloon is attached to the basket.
Day 4 of 4
Engaged: Take a quiz on rhythm.
Explore: Review coloring in neatly with tempera cakes.
Explain: Students finish painting their background.
Elaborate:
Students add their hot air balloon create 4 strings holding the basket show how to add their photo into the basket.
