Title of Project:Minecraft Architecture


Lesson Content Objective(s):
· I can compare cultural themes honoring history and tradition in American Architecture.
· I can Identify the use of art skills in Architecture and how it being an Architect is a job in art.
Lesson Language Objective(s):
I will learn about what an architect is and what Architecture is by exploring a famous artist and recreating a building in Minecraft.
Architecture: The art and science of design and erecting buildings and other physical structures.
▪ A general term to describe buildings and other infrastructures.
▪ A style and method of design and construction of buildings and other physical structures.
▪ The practice of an architect, where architecture means to offer or render professional services in connection with the design and construction of a building, or group of buildings and the space within the site surrounding the buildings, that have as their principal purpose human occupancy or use.[1]
Design activity, from the macro-level (urban design, landscape architecture) to the micro-level (construction details and furniture).
Architect: is a person trained in the planning, design and oversight of the construction of buildings.
Resources/materials: I Pad, Minecraft PE app, green screen app
Instructional Plan:
Engage: Explain that creating building is a job in art and that the people who build them are architects.
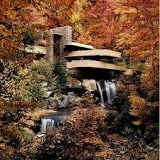
Explore: Explore different famous architects houses in art. Watch a video on Frank Lloyd Wright
Explain: Explain how to build in Minecraft PE app.
Elaborate:
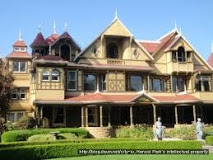
Students create an architecture looking at how different architects have created their houses.
Students make a house based off of that architects architecture in the Minecraft PE app.
Assessment:
Evaluate:
Students put their artwork in artsonia photography the house inside and outside explaining their building.
· I can compare cultural themes honoring history and tradition in American Architecture.
· I can Identify the use of art skills in Architecture and how it being an Architect is a job in art.
Lesson Language Objective(s):
I will learn about what an architect is and what Architecture is by exploring a famous artist and recreating a building in Minecraft.
Architecture: The art and science of design and erecting buildings and other physical structures.
▪ A general term to describe buildings and other infrastructures.
▪ A style and method of design and construction of buildings and other physical structures.
▪ The practice of an architect, where architecture means to offer or render professional services in connection with the design and construction of a building, or group of buildings and the space within the site surrounding the buildings, that have as their principal purpose human occupancy or use.[1]
Design activity, from the macro-level (urban design, landscape architecture) to the micro-level (construction details and furniture).
Architect: is a person trained in the planning, design and oversight of the construction of buildings.
Resources/materials: I Pad, Minecraft PE app, green screen app
Instructional Plan:
Engage: Explain that creating building is a job in art and that the people who build them are architects.
Explore: Explore different famous architects houses in art. Watch a video on Frank Lloyd Wright
Explain: Explain how to build in Minecraft PE app.
Elaborate:
Students create an architecture looking at how different architects have created their houses.
Students make a house based off of that architects architecture in the Minecraft PE app.
Assessment:
Evaluate:
Students put their artwork in artsonia photography the house inside and outside explaining their building.
Title of Project: Silly Face Graduation Self-Project
Lesson Content Objective(s):
Instructional Plan:
Engage: Talk about photography about how in the beginning photography they were black and white pictures and that if people wanted color photographers had to paint the color on the photographs.
Explore: Watch a: A Brief History of Photography
Explain: Show how to use several of the photography apps that would allow students to manipulate and change their image.
Elaborate:
Students photograph themselves and manipulate their picture using the apps. Adding color, funny glasses, party hats, and other stickers.
Students add words around their image to describe some of their favorite thing they have done in 5th grade.
Assessment:
Evaluate: Students write an artist statement on artsonia describing their favorite things about 5th grade.
- I can learn about self-portrait.
- I can learn about photography
- I will learn about self-portrait by Taking a picture of themselves.
Instructional Plan:
Engage: Talk about photography about how in the beginning photography they were black and white pictures and that if people wanted color photographers had to paint the color on the photographs.
Explore: Watch a: A Brief History of Photography
Explain: Show how to use several of the photography apps that would allow students to manipulate and change their image.
Elaborate:
Students photograph themselves and manipulate their picture using the apps. Adding color, funny glasses, party hats, and other stickers.
Students add words around their image to describe some of their favorite thing they have done in 5th grade.
Assessment:
Evaluate: Students write an artist statement on artsonia describing their favorite things about 5th grade.
Title of Project: Suspension or Solution
Wengie's Iceberg Slime
How to Mix Your Own Potions! #sciencegoals
Lesson Content Objective(s):
I will learn what is suspension by watching a video.
I will learn what is a solution by watching a video.
Resources/materials: mix 1 cup Glue, 1 bottle of shaving foam, 4 puffs baby powder, 3 squirts of hand lotion, glitter, and their color of watercolor, 1 pitcher of water and 1/4 cup borax 3/4 cup all purpose flour 1/2 cup warm water 1 tablespoon cream of tartar 1/4 cup salt 1 teaspoon vegetable oil (optional) 1 packet, unsweetened drink mix (0.14 oz, 3.9g) Yellow Food Coloring (optional) Blue Food Coloring (optional), I Pad, Play-Do Touch App, White paper, 8 buckets, staring tools
Instructional Plan:
Engage: Watch How to Mix Your Own Potions! #sciencegoals and discuss the different mixtures.
Explore: Watch Wengie's Iceberg Slime ask if its a Suspension or Solution. At a teacher table students mix 1 cup Glue, 1 bottle of shaving foam, 4 puffs baby powder, 3 squirts of hand lotion, glitter, and their color of watercolor of team choice in 4 big buckets. Once mixed students slowly start to mix borax solution of 1 pitcher of water and 1/4 cup borax. As they slowly mix solution starts to turn into slime. Students add their slime into last weeks project of Clay Monster.
Explain: In 4 new buckets we start to create play do. Homemade Playdough RecipeIngredients for EACH color:
In a bowl, mix flour, cream of tartar and salt.
In a mixing cup, add warm water and drink mix. Stir until completely dissolved.
Add water to flour mixture and stir well. Set aside for about five minutes.
Knead on a floured surface until no longer sticky.
Recipe from www.easypeasyandfun.com/easy-homemade-playdough-recipe/
Elaborate:
Once play do is made students go on the IPad in the App Play-Do Touch Students create an avatar out of play do on white paper the go on a sculpting adventure where the avatar finds different play do jars and tells them to sculpt different items like trees, flowers, and different creatures.
Checks for Understanding:
Students discuss the different things they have created.
- I can learn about additive sculpture techniques like scoring, kneading, and slip.
- I can learn how to create slime and play do
- I can learn about technology using an iPad app to create a world that they also sculpted.
- I can learn about mixtures.
I will learn what is suspension by watching a video.
I will learn what is a solution by watching a video.
Resources/materials: mix 1 cup Glue, 1 bottle of shaving foam, 4 puffs baby powder, 3 squirts of hand lotion, glitter, and their color of watercolor, 1 pitcher of water and 1/4 cup borax 3/4 cup all purpose flour 1/2 cup warm water 1 tablespoon cream of tartar 1/4 cup salt 1 teaspoon vegetable oil (optional) 1 packet, unsweetened drink mix (0.14 oz, 3.9g) Yellow Food Coloring (optional) Blue Food Coloring (optional), I Pad, Play-Do Touch App, White paper, 8 buckets, staring tools
Instructional Plan:
Engage: Watch How to Mix Your Own Potions! #sciencegoals and discuss the different mixtures.
Explore: Watch Wengie's Iceberg Slime ask if its a Suspension or Solution. At a teacher table students mix 1 cup Glue, 1 bottle of shaving foam, 4 puffs baby powder, 3 squirts of hand lotion, glitter, and their color of watercolor of team choice in 4 big buckets. Once mixed students slowly start to mix borax solution of 1 pitcher of water and 1/4 cup borax. As they slowly mix solution starts to turn into slime. Students add their slime into last weeks project of Clay Monster.
Explain: In 4 new buckets we start to create play do. Homemade Playdough RecipeIngredients for EACH color:
- 3/4 cup all purpose flour
- 1/2 cup warm water
- 1 tablespoon cream of tartar
- 1/4 cup salt
- 1 teaspoon vegetable oil (optional)
- 1 packet, unsweetened drink mix (0.14 oz, 3.9g)
- Yellow Food Coloring (optional)
- Blue Food Coloring (optional)
In a bowl, mix flour, cream of tartar and salt.
In a mixing cup, add warm water and drink mix. Stir until completely dissolved.
Add water to flour mixture and stir well. Set aside for about five minutes.
Knead on a floured surface until no longer sticky.
Recipe from www.easypeasyandfun.com/easy-homemade-playdough-recipe/
Elaborate:
Once play do is made students go on the IPad in the App Play-Do Touch Students create an avatar out of play do on white paper the go on a sculpting adventure where the avatar finds different play do jars and tells them to sculpt different items like trees, flowers, and different creatures.
Checks for Understanding:
Students discuss the different things they have created.
Title of Project: Clay Monster


Lesson Content Objective(s):
- I can learn about additive sculpture techniques like scoring, kneading, and slip.
- I can learn about difference between earthenware clay and terracotta clay.
- I can learn about additive sculpture and closed form sculpture.
- I can learn slab and coil sculpture techniques in clay.
- I will learn how to create a portrait out of clay by creating a face.
- I will learn how to create symmetrical balance by creating the same thing on both sides.
Vocabulary:
Portrait: a painting, drawing, photograph, or engraving of a person, esp. one depicting only the face or head and shoulders.
Symmetrical Balance: Same on both sides
Resources/materials: Clay, water, water cup, clay tools, Glaze paint, under glaze paint
Instructional Plan:
Engage: Discuss additive sculpture and how we knead, score, and coil clay to form objects. Discuss the difference between earthenware and terracotta clay.
Explore: Have students compare and contrast the sculptures from Easter Island Moai Statues, Totem poles, and The Sacro Bosco.
Explain: Show how to create a face using slab and coil clay techniques.
Elaborate:
Day 1:
- Students create cylinder around a paper tube.
- Students add eyes.
- Students add a nose.
- Students cut out a mouth creating a design.
- Students form designs and coils thinking whether they want their sculpture to resemble more of the Easter Island Moai Statues, Totem poles, or The Sacro Bosco.
- Students paint their sculpture with an under glaze.
Students paint their sculpture with glaze paint.
Checks for Understanding:
Student’s then give a verbal appreciation so someone at their table about their artwork and add their work to artsonia.
Title of Project: Flower foam print


Lesson Content Objective(s):
Lesson Language Objective(s):
I will learn block printing by carving into a foam plate.
I will learn the names of print making tools.
Vocabulary:
Block/Plate: The general term used to describe the material the design is carved into and from which the print will be created.
Brayer: The roller-type tool used to apply ink onto the printing plate.
Baren: The circular shaped tool used to apply pressure to the paper on the block. Rub gently on the back of the paper with the Baren to make the ink adhere to the paper.
Proof (Artists Proof): The first print pulled from the plate or block. The printmaker uses this to check the cut of the plate of the block.
Series: The number of prints produced in total from a block or plate. After the series is produced, the block is usually destroyed. The print series numbered “A/B”.
Resources/materials: paper, pencils, tempera paint, and foam print
Instructional Plan:
Engage: Discuss organic and geometric shapes.
Explore: Explain how to carve a print.
Explain: Show how to create a print and explain the tools to use in print making.
Elaborate:
Evaluate:
Students photograph their artwork in artsonia to share.
- I can carve a plate and produce a multiple edition print with accurate edition labels.
- I can learn about Print Making.
Lesson Language Objective(s):
I will learn block printing by carving into a foam plate.
I will learn the names of print making tools.
Vocabulary:
Block/Plate: The general term used to describe the material the design is carved into and from which the print will be created.
Brayer: The roller-type tool used to apply ink onto the printing plate.
Baren: The circular shaped tool used to apply pressure to the paper on the block. Rub gently on the back of the paper with the Baren to make the ink adhere to the paper.
Proof (Artists Proof): The first print pulled from the plate or block. The printmaker uses this to check the cut of the plate of the block.
Series: The number of prints produced in total from a block or plate. After the series is produced, the block is usually destroyed. The print series numbered “A/B”.
Resources/materials: paper, pencils, tempera paint, and foam print
Instructional Plan:
Engage: Discuss organic and geometric shapes.
Explore: Explain how to carve a print.
Explain: Show how to create a print and explain the tools to use in print making.
Elaborate:
- On a square foam piece students carve into foam flower design.
- Using the brayer students roll two paint colors blending to create a third on their foam print.
- Students print their foam by placing their foam design on paper using the barn to press their foam print into the design.
- Student create a 4 print flower design on their paper.
Evaluate:
Students photograph their artwork in artsonia to share.
Title of Project: Line Self-Portrait with chalk background


Lesson Content Objective(s):
Instructional Plan:
Engage: Show how to create a line drawing self portrait with the iPad.
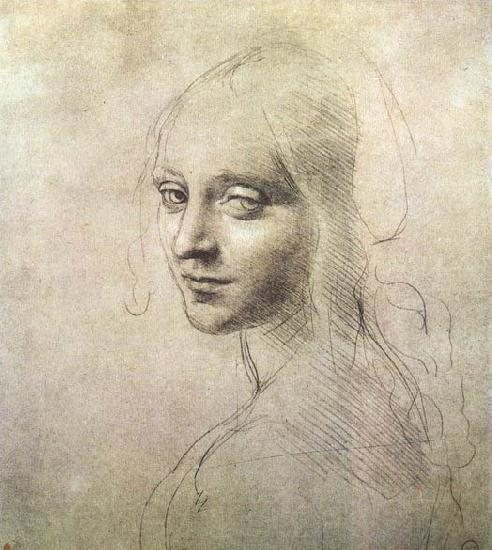
Explore: Explore Leonardo Da Vinci line portraits and discuss cross hatching to create value. Watch Cross hatching video.
Explain: Show how to create a blended chalk background.
Elaborate:
Evaluate: Students reflect on whether their portrait resembles them and if their proportions are correct. Students write an artist statement on artsonia.
- I can learn about self-portrait.
- I can learn about adding a stylized line to my Portraits like Leonardo Da Vinci.
- I can learn about photography.
- I will learn about self-portrait by creating a picture of themselves.
- I will learn about value by using crosshatching.
Instructional Plan:
Engage: Show how to create a line drawing self portrait with the iPad.
Explore: Explore Leonardo Da Vinci line portraits and discuss cross hatching to create value. Watch Cross hatching video.
Explain: Show how to create a blended chalk background.
Elaborate:
- Students photograph themselves on the iPad. Students use the cartoon app or pencil sketch to create a picture that has line drawing.
- Once the portrait is printed students use a black sharpie to create a their portrait on a transparency.
- For the background students create a rainbow background.
Evaluate: Students reflect on whether their portrait resembles them and if their proportions are correct. Students write an artist statement on artsonia.
Title of Project: Dream Catcher Weaving
How to Weave link safeshare.tv/x/dVJukGsDPHg


Materials: paper plate, Jazz Art Tempera Paint, yarn, hole punch, feathers, beads.
Content Objective:
Engage: Discuss what a dream catcher is and the meaning behind the dream catcher.Explore: Student paint Native American symbols around the rim of their plate with Jazz Art Gloss Paint.Explain: Show how to create a radial weaving on their plate. Discuss what the warp and weft lines are on the weaving and how to place it on their Dream catcher.Elaborate: Students complete a weaving in the center of their dream catcher. Students add three strings at the bottom of the plate with feathers and beads attached.
Assessment:
Evaluate: Students do a peer critique of a friends dream catchers by using the art sandwich. Writing: Something they like about the other students art. Then writing a suggestion they have for that students art. Third they write something else they like about that persons art.
Content Objective:
- I can learn about Native American Art.
- I can create a weaving.
- I can learn about Native American symbols and dream catchers.
- I will learn about radial weaving.
- I will design and describe pattern through the use of color in the artwork.
- I will learn about warp and weft lines by adding a vertical string for warp lines and a horizontal line of string for weft lines.
Engage: Discuss what a dream catcher is and the meaning behind the dream catcher.Explore: Student paint Native American symbols around the rim of their plate with Jazz Art Gloss Paint.Explain: Show how to create a radial weaving on their plate. Discuss what the warp and weft lines are on the weaving and how to place it on their Dream catcher.Elaborate: Students complete a weaving in the center of their dream catcher. Students add three strings at the bottom of the plate with feathers and beads attached.
Assessment:
Evaluate: Students do a peer critique of a friends dream catchers by using the art sandwich. Writing: Something they like about the other students art. Then writing a suggestion they have for that students art. Third they write something else they like about that persons art.
Title of Project: Family Portrait


Lesson Content Objective(s):
Portrait- a pictures that shows what a person, a group of people, or an animal looks like
Self Portrait- a portrait of an artist made by himself
Scene- a view of a certain place
Photorealism- a style of painting that looks almost like a photograph
Proportion- the size and placement of one thing compared with the size and placement of other things.
Foreground- the part of an artwork that seems to be closest to the viewer
Background- the part of an artwork that seems to be farthest away from the viewer
Value- the lightness or darkness of a color
Tint- a lighter value of a color, made by mixing it with white
Shade- a darker value of a color, made by mixing it with black.
Visual Texture- Drawn or painted texture that looks like real texture.
Resources/materials: water-color pencils
Instructional Plan:
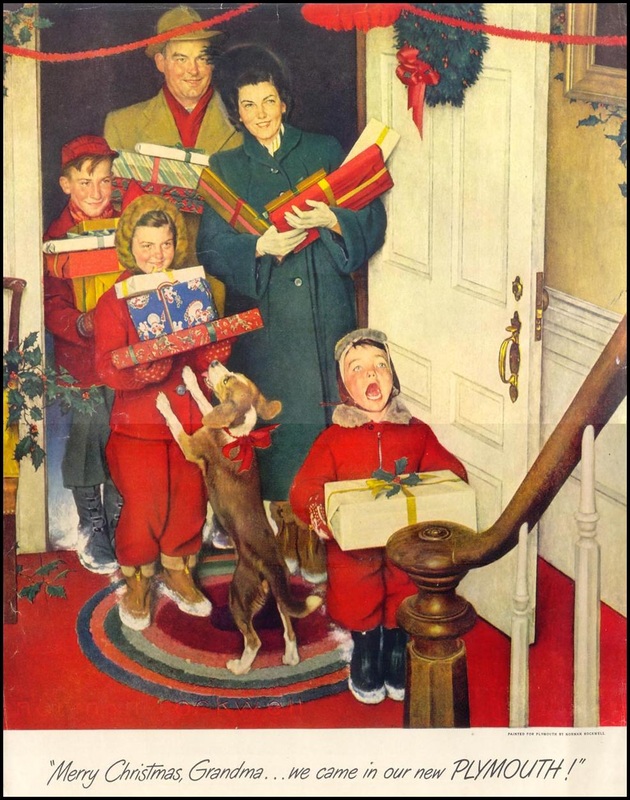
Engage: Show family portraits and discuss how they can tell a story. Have them brainstorm different ways that they could draw their family portrait. For Example, family at thanksgiving, family in the snow, family at Christmas, or family on a couch.
Explore: Discuss artist Francisco de Goya and his portrait paintings compare and contrast his work with Norman Rockwell.
Explain: Discuss how his family portraits are like going to a photographer today and having a family portrait taken. Explain how to draw a family portrait.
Elaborate:
Assessment:
Evaluate: Students show their pictures and explain how they combine themselves into their family portrait.
- I can learn about Self-Portraits and Family Portraits.
- I can learn about Francisco de Goya and Norman Rockwell.
- I can learn about proportions.
- I can learn about textures and values.
- I can learn about foreground and background.
- I will learn about self-portraits by creating a picture of themselves.
- I will learn about family portraits by creating my family.
Portrait- a pictures that shows what a person, a group of people, or an animal looks like
Self Portrait- a portrait of an artist made by himself
Scene- a view of a certain place
Photorealism- a style of painting that looks almost like a photograph
Proportion- the size and placement of one thing compared with the size and placement of other things.
Foreground- the part of an artwork that seems to be closest to the viewer
Background- the part of an artwork that seems to be farthest away from the viewer
Value- the lightness or darkness of a color
Tint- a lighter value of a color, made by mixing it with white
Shade- a darker value of a color, made by mixing it with black.
Visual Texture- Drawn or painted texture that looks like real texture.
Resources/materials: water-color pencils
Instructional Plan:
Engage: Show family portraits and discuss how they can tell a story. Have them brainstorm different ways that they could draw their family portrait. For Example, family at thanksgiving, family in the snow, family at Christmas, or family on a couch.
Explore: Discuss artist Francisco de Goya and his portrait paintings compare and contrast his work with Norman Rockwell.
Explain: Discuss how his family portraits are like going to a photographer today and having a family portrait taken. Explain how to draw a family portrait.
Elaborate:
- With pencil Sketch a family-portrait.
- Students color in their family-portrait with water-color pencils.
Assessment:
Evaluate: Students show their pictures and explain how they combine themselves into their family portrait.
Title of Project: Clay Animal Vase


| turkeyclayvase.pdf |
| polarbearclayvase.pdf |
| owlclayvase.pdf |
| penguinclayvase.jpeg.pdf |
Lesson Content Objective(s):
Lesson Language Objective(s):
I will learn about the difference between two-dimensional and three-dimensional art by creating a vase.
I will learn about positive and negative space by adding and subtracting clay on a vase.
I will learn about construction by building a vase.
Resources/materials: Clay, water, water cup, clay tools, acrylic
Instructional Plan:
Engage: Read pages 68-70 Talk about patterns in sculpture.
Explore: Discuss how pottery is also a job in art.
Explain: Discuss additive sculpture. Students learn about stencils and how to use additive sculpture with slab clay to create a design of a animal vase.
Elaborate:
Day 1: Students create a animal vase by cutting out a stencil on a clay slab.
Students form the animal vase by bringing up the walls into a cube like shape.
Students add texture. Carving windows, doors, shingles on the roof.
Day 2:
Students paint their animal vase with Acrylic paint.
Assessment:
Evaluate:
Students show their animal vases and talk about what they added that represents them.
- I can learn about additive sculpture techniques like scoring, kneading, and slip.
- I can learn about difference between earthenware clay and terracotta clay.
- I can learn about additive sculpture.
- I can learn about creating a functional design.
- I can learn about slab rolling designs.
- I can learn a job in art.
Lesson Language Objective(s):
I will learn about the difference between two-dimensional and three-dimensional art by creating a vase.
I will learn about positive and negative space by adding and subtracting clay on a vase.
I will learn about construction by building a vase.
Resources/materials: Clay, water, water cup, clay tools, acrylic
Instructional Plan:
Engage: Read pages 68-70 Talk about patterns in sculpture.
Explore: Discuss how pottery is also a job in art.
Explain: Discuss additive sculpture. Students learn about stencils and how to use additive sculpture with slab clay to create a design of a animal vase.
Elaborate:
Day 1: Students create a animal vase by cutting out a stencil on a clay slab.
Students form the animal vase by bringing up the walls into a cube like shape.
Students add texture. Carving windows, doors, shingles on the roof.
Day 2:
Students paint their animal vase with Acrylic paint.
Assessment:
Evaluate:
Students show their animal vases and talk about what they added that represents them.
Title of Project: Op Art


Compare and Contrast the two Op Art Paintings on the Worksheet.

Bridget Riley, Fisson
|

Victor Vasarely, Vega 200
|
Art, Grade 5
identify in artworks that color, texture, form, line, space, and value are basic art elements and that the principles such as emphasis, pattern, rhythm, balance, proportion, and unity serve as organizers.[1.B]
compare relationships between design and everyday life.[2.B]
compare artworks from several national periods, identifying similarities and differences.[3.A]
analyze personal artworks to interpret meaning.[4.A]
use prior knowledge and experiences to understand meanings in English.[ELP.1A]
Lesson Content Objective(s):
Resources/materials: Markers, Ruler, watercolors, crayons
Instructional Plan:
Engage: Read pages 192-194
Explore: Compare and Contrast how Bridget Riley and Victor Vasarely paintings guide the eye in different directions.
Explain:Watch a video on Analogous colors.
Elaborate:
Students look at the op art worksheet and pick a op Art design to create. Then repeat that shape several times in the picture to give an optical illusion of movement.
Students connect the shapes with lines creating a checkerboard pattern or a line pattern and fill in with the analogous color.
Assessment:
Evaluate: Students explain how their art tricks the eye.
identify in artworks that color, texture, form, line, space, and value are basic art elements and that the principles such as emphasis, pattern, rhythm, balance, proportion, and unity serve as organizers.[1.B]
compare relationships between design and everyday life.[2.B]
compare artworks from several national periods, identifying similarities and differences.[3.A]
analyze personal artworks to interpret meaning.[4.A]
use prior knowledge and experiences to understand meanings in English.[ELP.1A]
Lesson Content Objective(s):
- I can learn geometric shapes.
- I can learn the definition of Op Art, optical illusions, and one-point perspective.
- I can learn about artist Victor Vasarely.
- I can learn about analogous color schemes by watching a video on it and adding it to my art work.
- I can learn about rhythm in art by repeating shapes.
Resources/materials: Markers, Ruler, watercolors, crayons
Instructional Plan:
Engage: Read pages 192-194
Explore: Compare and Contrast how Bridget Riley and Victor Vasarely paintings guide the eye in different directions.
Explain:Watch a video on Analogous colors.
Elaborate:
Students look at the op art worksheet and pick a op Art design to create. Then repeat that shape several times in the picture to give an optical illusion of movement.
Students connect the shapes with lines creating a checkerboard pattern or a line pattern and fill in with the analogous color.
Assessment:
Evaluate: Students explain how their art tricks the eye.
Title of Project: Aerial View Perspective Snowman

|

|

|
Art, Grade 5
communicate ideas about feelings, self, family, school, and community, using sensory knowledge and life experiences.[1.A]
combine information from direct observation, experience, and imagination to express ideas about self, family, and community.[2.A]
compare relationships between design and everyday life.[2.B]
create original artworks and explore photographic imagery, using a variety of art materials and media appropriately.[2.C]
analyze original artworks, portfolios, and exhibitions by peers and others to form conclusions about properties.[4.B]
use prior knowledge and experiences to understand meanings in English.[ELP.1A]
Lesson Content Objective(s):
• I can paint using primary and secondary colors.
• I can learn about winter.
• I can make Ariel perspective by creating a snowman from above.
I can learn about a holiday card contest.
Lesson Language Objective(s):
• I will learn how to create how to create secondary colors by mixing primary colors.
• I will learn how to create contrast by placing dark colors next to light colors.
I will learn how perspective is how you view an object.
Resources/materials: 8 X 11 white bristol board paper , tempera paint.
Instructional Plan:
Engage: Talk about winter and how the snowman look outside. Talk about the holiday card contest.
Explore: Discuss how perspective and how things would look if your viewing them from above is ariel perspective.
Explain: Go step by step how to paint a winter snowman.
Elaborate: Students add details their winter snowman to create it as individually their own.
Assessment:
Evaluate: Students show their snowman.
Title of Project: Surrealism melted animals
| surrealism.ppt |


Lesson Content Objective(s):
Lesson Language Objective(s):
Instructional Plan:
Engage: Look at the about Surrealism power point.
Explore: Compare and contrast surrealism artist Rene Magritte and Salvador Dali.
Explain: Discuss Salvador Dali's animal pictures and explain different way to create strange animals
Elaborate:
Assessment:
Evaluate: Students add their artwork into artsonia writing an artist statement.
- I will learn about artist René Magritte and Salvador Dali.
- I will learn about the Surrealism art movement.
- I can clean up after my self following rules and procedures.
- I can respect others in the art room at all times.
Lesson Language Objective(s):
- I will be able to create movement using shapes and color.
- I will learn about overlapping by putting shapes or objects on top of shapes.
- I will learn about Surrealism by creating a dream like animal.
- I will learn about texture by adding melted crayon and glueing different textures to my project.
Instructional Plan:
Engage: Look at the about Surrealism power point.
Explore: Compare and contrast surrealism artist Rene Magritte and Salvador Dali.
Explain: Discuss Salvador Dali's animal pictures and explain different way to create strange animals
Elaborate:
- Students draw an strange exaggerated animal.
- Students color the animal in weird strange colors and melt crayon on their animal to create a weird textures.
- Students add textures from the texture box to finish their picture.
Assessment:
Evaluate: Students add their artwork into artsonia writing an artist statement.
Title of Project:Wayne Thiebaud Paper Mache’ Cake


|

Wayne Thiebaud
|


Wayne Thiebaud

Teks: 5.1B Identify in artworks that color, texture, form, line, space and value are basic art elements and that principles such as emphasis, pattern, rhythm, balance, proportion and unity serve as organizers.
Creative Expression/Performance: 5.2 A combine information from direct observation, experience, and imagination to express ideas about self, family, and community.
Historical/Cultural Heritage: 5.3B Compare cultural themes honoring history and tradition in American and other artworks. 5.3C Identify the use of art skills in a variety of jobs.
Response/Evaluation: 5.4A Analyze personal artworks to interpret meaning.
Lesson Content Objective(s):
Students will learn about Pop Art by reading about it in the book and learning about Wayne Thiebaud.
Students will learn about form by creating a 3-D cake.
Artist:
Wayne Thiebaud (born November 15, 1920) is an American painter whose most famous works are of cakes, pastries, boots, toys and lipsticks. His last name is pronounced "Tee-bo." He is associated with the Pop art movement because of his interest in objects of mass culture, although his works, executed during the fifties and sixties, slightly predate the works of the classic pop artists. Thiebaud uses heavy pigment and exaggerated colors to depict his subjects, and the well-defined shadows characteristic of advertisements are almost always included in his work.
Buddy Valastro http://carlosbakery.com/Home.php
Chef Duff http://www.charmcitycakes.com/gallery
Resources/materials:paper, paper forms, newspaper, glue, paint, texture acrylic paint, acrylic paint, paper plate.
Instructional Plan:
Engage: Read about Pop art in the book and discuss the artist Wayne Thiebuad.
Explore: Students learn how to create a form base Cylinder to help create their cake.
Elaborate: Students than paper Mache their form to make sure it hold its shape.
Students add acrylic paint to decorate their cakes.
Students add tiny details like paper flowers, bows, sprinkles, ribbons, and words to finish their cakes.
Evaluate: Students add their design to artsonia and write a critique about their cake.
Creative Expression/Performance: 5.2 A combine information from direct observation, experience, and imagination to express ideas about self, family, and community.
Historical/Cultural Heritage: 5.3B Compare cultural themes honoring history and tradition in American and other artworks. 5.3C Identify the use of art skills in a variety of jobs.
Response/Evaluation: 5.4A Analyze personal artworks to interpret meaning.
Lesson Content Objective(s):
- Students learn about form.
- Students learn about artist Wayne Thiebuad
- Students learn about patterns and textures in cake.
- Analyze personal artworks.
- Demonstrate how to conserve and recycle art materials
Students will learn about Pop Art by reading about it in the book and learning about Wayne Thiebaud.
Students will learn about form by creating a 3-D cake.
Artist:
Wayne Thiebaud (born November 15, 1920) is an American painter whose most famous works are of cakes, pastries, boots, toys and lipsticks. His last name is pronounced "Tee-bo." He is associated with the Pop art movement because of his interest in objects of mass culture, although his works, executed during the fifties and sixties, slightly predate the works of the classic pop artists. Thiebaud uses heavy pigment and exaggerated colors to depict his subjects, and the well-defined shadows characteristic of advertisements are almost always included in his work.
Buddy Valastro http://carlosbakery.com/Home.php
Chef Duff http://www.charmcitycakes.com/gallery
Resources/materials:paper, paper forms, newspaper, glue, paint, texture acrylic paint, acrylic paint, paper plate.
Instructional Plan:
Engage: Read about Pop art in the book and discuss the artist Wayne Thiebuad.
Explore: Students learn how to create a form base Cylinder to help create their cake.
Elaborate: Students than paper Mache their form to make sure it hold its shape.
Students add acrylic paint to decorate their cakes.
Students add tiny details like paper flowers, bows, sprinkles, ribbons, and words to finish their cakes.
Evaluate: Students add their design to artsonia and write a critique about their cake.
Title of Project: Graphic Design Mascot
Proactive
Respect
Integrity
Dedicated
Engaged


| elm_project_cards.docx |
| mascot_form.docx |

Art, Grade 5
communicate ideas about feelings, self, family, school, and community, using sensory knowledge and life experiences.[1.A]
identify in artworks that color, texture, form, line, space, and value are basic art elements and that the principles such as emphasis, pattern, rhythm, balance, proportion, and unity serve as organizers.[1.B]
combine information from direct observation, experience, and imagination to express ideas about self, family, and community.[2.A]
create original artworks and explore photographic imagery, using a variety of art materials and media appropriately.[2.C]
identify the use of art skills in a variety of jobs.[3.C]
analyze personal artworks to interpret meaning.[4.A]
use prior knowledge and experiences to understand meanings in English.[ELP.1A]
Lesson Content Objective(s):
Lesson Language Objective(s):
Students learn that graphic design is the art or skill of combining text and pictures in advertisements, magazines, or books by collaborating on a project about our school mascot.
Resources/materials: Bristol board, color pencil, tape, glue, scissors, IPad
Instructional Plan:
Engage: Show students how to enter the room. Explain the classroom procedures. Have students introduce themselves and something about them.
Explore: Read, "What do you do with a problem?" by Kobi Yamada
Explain: Pride: Proactive, Respect, Integrity, Dedicated, Engaged
Show how to work in teams.
Elaborate:
communicate ideas about feelings, self, family, school, and community, using sensory knowledge and life experiences.[1.A]
identify in artworks that color, texture, form, line, space, and value are basic art elements and that the principles such as emphasis, pattern, rhythm, balance, proportion, and unity serve as organizers.[1.B]
combine information from direct observation, experience, and imagination to express ideas about self, family, and community.[2.A]
create original artworks and explore photographic imagery, using a variety of art materials and media appropriately.[2.C]
identify the use of art skills in a variety of jobs.[3.C]
analyze personal artworks to interpret meaning.[4.A]
use prior knowledge and experiences to understand meanings in English.[ELP.1A]
Lesson Content Objective(s):
- Students will be able to know art classroom procedures.
- Students will learn how to cleanup.
- Students will understand classroom expectations.
- Students learn how to show mutual respect in the art classroom throughout the art day.
- Students learn about graphic design.
- Students learn to collaborate by working in teams.
- Students will be able to identify lines, texture, patterns and shapes.
Lesson Language Objective(s):
Students learn that graphic design is the art or skill of combining text and pictures in advertisements, magazines, or books by collaborating on a project about our school mascot.
Resources/materials: Bristol board, color pencil, tape, glue, scissors, IPad
Instructional Plan:
Engage: Show students how to enter the room. Explain the classroom procedures. Have students introduce themselves and something about them.
Explore: Read, "What do you do with a problem?" by Kobi Yamada
- Students Go over the four expectations of Ideal Classroom using:
- Mutual Respect: (Respect yourself, others, and propriety at all times.)
- Active Listening: (Criss-cross applesauce, voices off, eyes forward.)
- No Put Downs: (Complement others.)
- Right to Pass: (To choose to share in community circle.)
- Explain Pride: Proactive, Respect, Integrity, Dedicated, Engaged
Explain: Pride: Proactive, Respect, Integrity, Dedicated, Engaged
Show how to work in teams.
Elaborate:
- Students choose whether to be in teams of two, three, or four.
- Students think about whether they think the Malvern Mascot should be changed or stay the same.
- If they think it should stay the same they have to explain why by either creating a poster or video or project to explain why everyone should like it.
- If they don't like the mascot students create their own design.
- Students choose whether they want it to be; human, animal, object, or a creature.
- Students then choose a way to show their mascot: poster, t-shirt design, mask, create a video on the iPad.
