Title of Project:Finish the Draw what's attacking the city.


Content Objective:
I can review square, triangle, and rectangle shapes.
I can learn about five senses and how it relates to creature.
I can color in neatly and completely.
Language Objective:
I will learn about line by creating lines on a creature.
I will learn about rhythm by repeating line or shape.
Materials: paper, crayons
Engage: Look at the finish the draw talk about what could be attacking the city.
Explore: Discuss how a finish the Draw works.
Explain: Show how to draw a creature.
Elaborate: Student’s draw their creature in their cityscape and color in neatly.
Evaluate: Students show their work to other students.
Title of Project: Piranha


Content Objective:
I can create a fish moving paper sculpture.
Language Objective:
I will learn rhythm by repeating lines, and shapes.
I will learn form by creating a relief piranha.
Materials: Piranha handout, scissors, crayons
Engage: Show how the Piranha is a moving sculpture talking about form.
Explore: Show how to create the 3-D paper sculpture.
Explain: Talk about rhythm by creating repeating shapes and lines on their fish.
Elaborate: Students color in their piranha neatly and completely.
Evaluate: Students share their piranha’s with other students.
Title of Project: Droid Creation

|
Lesson Content Objective(s): I can learn about collage. I can learn about robot design. I can learn to color in neatly. Lesson Language Objective(s): I will learn about contrast with color and texture. I will be able to create rhythm by repeating the same shape so it moves your eye through the robot. Resources/materials: color-pencils, Markers, glue sticks,scissors Instructional Plan: Engage: Talk about May 4be with you. Explore: Discuss about how we create a robot that will be filling our white space. Explain: Show how to collage a robot Elaborate: Students color in neatly and completely on their robots. Students add their own creativity to their pictures adding interesting designs to their robots. |
Title of project: Paper Bag Vest

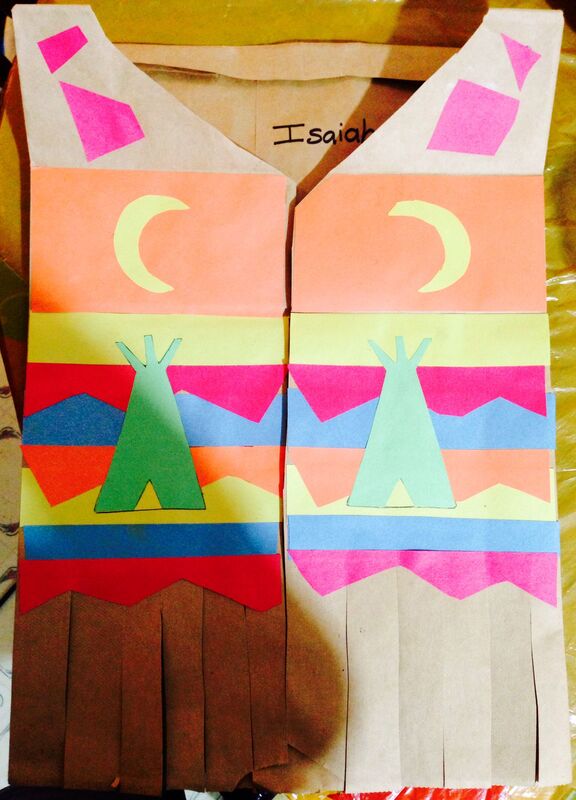

Content Objective:
I can learn art that you can wear.
I can learn a job in art, fashion design.
Language Objective:
I can learn form by creating a 3-D art work that you can wear.
I can learn rhythm by repeating lines and shapes.
Materials:
Instructional Plan:
Engage: Talk about how fashion design as a job in art. Discuss how clothing is a functional art form that you can wear.
Explore: Show how to cut their paper bag to create a vest. https://safeshare.tv/x/CbLj7QyvVRo
Explain: Discuss designs that students can create on their vest.
Elaborate: Students color in their paper bag vest with markers.
Title of Project: Weaving Hot Air ballon

|

|
Week: April 5-9 & 13-16
Materials: paper, weaving strips, scissors, glue, crayons, Watercolors
Content Objective:
I can about pattern, texture, and repetition.
I can learn about weaving.
I can learn about functional art.
I can learn rhythm by creating repetition with weaving.
Language Objective:
I will learn weaving.
I will learn about warp lines by cutting a one-inch line on the fold line creating a vertical warp line.
I will learn about weft lines by weaving a horizontal line in and out of the weft lines.
Instructional Plan: Part one video: safeshare.tv/x/n2NQqubyMDM
Engage: Talk about background for our hot air balloons. Using crayons and watercolors students create a cityscape for their hot air balloons to fly over using plenty of sky.
Explore: Watch a video about rhythm https://safeshare.tv/x/Q9umdxKHuoQ. Create a city showing rhythm.
Explain: Discuss weaving. Students learn about weft and warp means in weaving. Explore images of hot air balloon and discuss what they are. Talk about the hot air balloon that they see over McKinney. Explain how to create a Warp and Weft out of paper to create their weaving.
Elaborate:
1. Student’s fold paper in half creating one-inch vertical lines. On the open-end students create a one-inch horizontal stop line. Students cut one-inch vertical slits into the paper to form a warp.
2. Student’s weave one-inch strips horizontally though the paper creating a checkerboard design.
3. Once students finish weaving they glue the ends and trim the corners of their rectangle to create an oval design. Students can add detail with markers to their balloon.
4.Once students have an oval woven shape they have the balloon of their hot air balloon.
5.Students then add a basket and a photo of themselves as the person in the basket and glue on strings to make it look as though the balloon is attached to the basket.
Evaluate: Students reflect on the patterns and texture their weaving have.
Day 2:
Engage: Talk Weaving what a warp and weft is and how to create it into a hot air balloon. Click the how to link: https://safesha.re/26kj
Explore: Review the word rhythm and how it occurs in weaving.
Explain: Discuss weaving. Students learn about weft and warp means in weaving. Explore images of hot air balloon and discuss what they are. Talk about the hot air balloon that they see over McKinney. Explain how to create a Warp and Weft out of paper to create their weaving.
Elaborate:
1. Student’s fold paper in half creating one-inch vertical lines. On the open-end students create a one-inch horizontal stop line. Students cut one-inch vertical slits into the paper to form a warp.
2. Student’s weave one-inch strips horizontally though the paper creating a checkerboard design.
3. Once students finish weaving they glue the ends and trim the corners of their rectangle to create an oval design. Students can add detail with markers to their balloon.
4.Once students have an oval woven shape they have the balloon of their hot air balloon.
5.Students then add a basket and a photo of themselves as the person in the basket and glue on strings to make it look as though the balloon is attached to the basket.
Evaluate: Students reflect on the patterns and texture their weaving have.
Title Of Project: Clay Animal Vase


Lesson Content Objective(s):
I can learn about additive sculpture techniques like scoring, kneading, and slip.
I can learn about difference between earthenware clay and terracotta clay.
I can learn about additive sculpture.
I can learn about creating a functional design.
I can learn how to create a pinch pot.
I can learn a job in art.
Lesson Language Objective(s):
I will learn about the difference between two-dimensional and three-dimensional art by creating a vase.
I will learn about emphasis by creating a focus on the face of an animal.
I will learn about value by mixing white and black paint to create lighter and darker colors.
Resources/materials: Clay, water, water cup, clay tools, acrylic paint,
(If virtual you can pick up your clay in the office. Once you have completed the sculpture you will need to bring it in to the school where it can be fired to turn it into glass. Then you will be able to pick it up and be able to paint it at home.)
https://safeshare.tv/x/ujN8qIb-1VM
Engage: Look at sculptures discuss the functionality of the pottery items.
Explore: Discuss how pottery is also a job in art.
Explain: Discuss additive sculpture. Students learn how to create a pinch pot and how to use additive sculpture with slab clay to create a design of an animal.
Elaborate:
Students create a pinch pot. Students smooth their pot. Students add an animal head or face to their pot. Students then add other decorative items to their pot to create their animal for example like legs to their pinch pot.
Elaborate:
Students create a coil pot. Students smooth their coil pot. Students add an animal head and legs to their coil pot.
Day 2:
Engage: Quiz on value and emphasis. https://share.nearpod.com/gnlJvJt3ibb Code: 6SJZH
Explore: Discuss acrylic paint and blending tints and shadows.
Explain: Talk about coloring in neatly and what it looks like in pottery.
Elaborate:
Students create eyes, nose, mouth and ears with paint.
Elaborate:
Students add their pot to seesaw or artsonia.
Title of Project: Stained glass fish


Content Objective:
I can learn about color and how it affects artwork.
I can learn about emphasis.
I can learn about Stain Glass.
Language Objective:
I will learn that portraits can be an animal.
I will learn about stain glass and how it reflects light.
I will learn Emphasis by creating stained glass fish.
Materials: watercolor, and crayon.
Engage: Learn about emphasis watch emphasis video https://safeshare.tv/x/5MjLxXdz6Y0 and how to create it in a picture.
Explore:Show a video about the history of stained glass. https://safeshare.tv/x/ss603c0292294d5
Explain: Show step by step how to create a fish paper stained glass.https://safeshare.tv/x/P95Dg-42XTg
Elaborate:
Students add multi colored tissue paper to fish stained glass border.
Day 2:
Engage: Review about emphasis watch emphasis video https://safeshare.tv/x/5MjLxXdz6Y0 and how to create it in a picture.
Explore:Show a video about the history of stained glass. https://safeshare.tv/x/ss603c0292294d5
Explain: Show step by step how to create a fish paper stained glass. https://youtu.be/P95Dg-42XTg
Elaborate:
Students add multi colored tissue paper to fish stained glass border.
Title of Project: Alien Landscape


|

|
Lesson Content Objective(s):
I can learn about landscapes.
I can learn about horizon line.
I can learn to color in neatly.
Lesson Language Objective(s):
I will learn about space and what it means in art.
I will learn about contrast with color and texture.
I will be able to create rhythm by repeating the same shape so it moves your eye through the picture.
I will learn about foreground, mid-ground, and background.
Resources/materials: color-pencils
Instructional Plan:
Engage: Watch a video about space.https://safeshare.tv/x/ss60206dd005281
Explore: Discuss about how we create a picture that will be filling our white space.
Explain: If virtual you can watch this video. https://safeshare.tv/x/Q5r9oe1EYjg Be aware you don't have to make the same picture as him you can create your own alien, alien home, and alien landscape. Show how to draw alien in the foreground. Show how to create a ship or alien home in the mid-ground. Show how to create an alien landscape in the background.
Elaborate:
Students color in neatly and completely on their pictures. Students add their own creativity to their pictures adding an alien sky with planets and they can add themselves to their pictures.
Assessment:
Evaluate: Add artwork to Artsonia, or Seesaw if virtual.
Day 2:
Instructional Plan:
Engage: Quiz on Contrast https://share.nearpod.com/Ka5SzwMUnbb code 27DT8
Explore: Discuss about how we create a picture that will be filling our white space.
Explain: If virtual you can watch this video. https://safeshare.tv/x/Q5r9oe1EYjg Be aware you don't have to make the same picture as him you can create your own alien, alien home, and alien landscape. Show how to draw alien in the foreground. Show how to create a ship or alien home in the mid-ground. Show how to create an alien landscape in the background.
Elaborate:
Students color in neatly and completely on their pictures. Students add their own creativity to their pictures adding an alien sky with planets and they can add themselves to their pictures.
Evaluate: Add artwork to Artsonia, or Seesaw if virtual.
Title Of Project: Van Gogh Sunflowers

Vincent Van Gogh, Sunflower
|

Georgia O'keeffe, Sunflower
|

Lesson Content Objective(s):
I can color in neatly and completely.
I can create a still life.
I can learn about the artist Vincent Van Gogh
Lesson Language Objective(s):
I will learn how to create value and texture with paint using tints and shades.
I will learn how unity allows all elements in art work combine to create a whole.
Resources/materials: tempera paint, crayon
Day 1
Engage: Quiz on balance. https://share.nearpod.com/tHybwSgY3bb Code: 3IEWK
Explore: Read Camille and the Sunflowers https://safeshare.tv/x/ss600dce0ae5ff6 and discuss Vincent Van Gogh’s Sunflowers and discuss how to create value with paint in tints and shades.
Explain: Talk about creating a theme with their picture creates unity by linking everything together.
Look at Georgia O'Keefe's flowers and compare and contrast Vincent Van Gogh Flowers.
Elaborate: Step by step how to video https://safeshare.tv/x/ss600dd29ae240c
Student’s create a vase.
Student's with a crayon draw circle as the pollen of the Sunflower.
Student's then create petals for the Sunflowers.
Student's then create more sunflower petals.
Student's add a table.
Student’s color in picture with sunflowers still life.
Evaluate: Students add their artwork to artsonia or seesaw. Students reflect which of their flowers writing an artist statement.
Day 2:
Engage: Watch a video about Contrast. https://safeshare.tv/x/d4qjDgXmRyk
Explore: Discuss Vincent Van Gogh’s Sunflowers and discuss how to create value with paint in tints and shades.
Explain: Talk about creating a theme with their picture creates unity by linking everything together.
Look at Georgia O'Keefe's flowers and compare and contrast Vincent Van Gogh Flowers.
Elaborate: Step by step how to video https://safeshare.tv/x/ss600dd29ae240c
Student’s create a vase.
Student's with a crayon draw circle as the pollen of the Sunflower.
Student's then create petals for the Sunflowers.
Student's then create more sunflower petals.
Student's add a table.
Student’s color in picture with sunflowers still life.
Evaluate: Students add their artwork to artsonia or seesaw. Students reflect which of their flowers writing an artist statement.
Title Of Project: Viking ship


Materials: color-pencils, glue, scissors, straw, and ship form template.
Content Objective:
I can learn about Viking Art.
I can learn about paper-craft sculpture
Language Objective:
I will learn about texture creating a visual texture on the boat.
I will learn about form by creating a 3-D boat.
I will learn about balance by making sure that the 3-D boat stands up.
(Virtual Students, if you don't have a way to print the template that is in see saw. Then you may draw a viking ship.)
Engage: Watch a video about the history Viking long ships https://youtu.be/kge0c2mNmRQ safe share link https://safeshare.tv/x/ss5ff3ed97bfda4
Explore: Discuss how the Vikings made their ships decorative and into art.
Explain: Explain how to color in the shields with contrast and patterns. Discuss how we can add texture to the boat to make it look like wood.
Discuss different sails that we can create to make our Viking ship art, for example patterns, runes, or animal designs.
Elaborate: Show how to glue their paper craft template together discussing balance to make sure their ship stands.
Evaluate: Students add their ship to see saw or artsonia
Day 2
(Virtual Students, if you don't have a way to print the template that is in see saw. Then you may draw a viking ship.)
Engage: Discuss the art principal Balance https://youtu.be/2eLaq6Yqm3o safe share link https://safeshare.tv/x/2eLaq6Yqm3o
Explore: Discuss the shapes of the ship. Explain how we cut out the ship. Discuss in what line to cut to create lines on the viking ship.
Explain: Show step by step how to glue the viking ship together.
Discuss different sails that we can create to make our Viking ship art, for example patterns, runes, or animal designs.
Elaborate: Show how to glue their paper craft template together discussing balance to make sure their ship stands.
Evaluate: Students add their ship to see saw or artsonia
Title Of Project: Skiing Portraits

Lesson Content Objective(s):
I can learn about emphasis, subject, and self-portrait.
I can learn how art can tell about weather.
Lesson Language Objective(s):
I will learn about self portraits by painting a picture of them selfs.
Resources/materials: Collage, Winter portrait Template, glue, scissors , popsicles,
Instructional Plan:
Engage: Watch a sing a long Little Snowflake https://youtu.be/tbbKjDjMDok
Explore: Discuss clothes we wear when it's cold and sports that we do in the snow.
Explain: Show how to color in the person template
Elaborate:
Show how to add the ski's and ski hand sticks. https://youtu.be/_tC4jMDOqpE
Assessment:
Evaluate: Happy holidays.
Title Of Project: Giving day Pattern Bracelets

Week: Dec. 7-11
Materials: construction paper or pony beads, pipe cleaner, bell
Content Objective:
I can be able to create a pattern with beads.
I can learn about a job in art, jewelry making.
I can create an artwork a person can wear.
Vocabulary Objective:
I will be able to create pattern by repeating colors in their design.
I will be able to learn about complementary color.
Engaged: Talk about giving day and how they are making something in their classroom to give to someone like, firefighters, doctors & nurses, policeman, or people less fortune then them.
Explore: Talk about what a pattern is how to create it with the beads by repeating two or three colors.
Explain: Talk about complementary colors. https://youtu.be/Pix5lBCmUjc
Elaborate:
Show how to string the pony beads onto a pipe cleaner. Students pick their complementary color design in the center of the bracelet students add a bell.
If you are virtual and don't have pony bead you can make your beads out of paper. https://youtu.be/m_brtyWa0Jg
If you don't have supplies to create a bracelet and you're virtual you can chose to create a card instead to give to someone that has patterns and complementary colors.
Evaluate:
When you finish your bracelet think about who are you giving it to. Is it going to go into your kit for the person you are giving to for giving day or is going to someone else.
Title of Project: Pot Belly Snowman
Lesson Objective:
I can learn about paper craft forming shapes.
I can learn about form.
Language objective:
I will learn about contrast by create a snowman that stands out.
I will learn about patterns by creating by repeating two colors on a scarf.
Materials: glue, scissors, snowman handout.
Instructional Plan:
Engage: Watch a video about contrast. https://youtu.be/l5Q52qe9mUI
Explore: Show how to create snow in the sky background.
Explain: Show how to create a pot belly snowman https://youtu.be/l3glOVUWdSY
Elaborate: Students create a color contrast with the hat and scarf of the snowman
Evaluate:
Add their picture to seesaw or artsonia. Talk about what we learned that day.
assignment from: kidscraftroom.com/3d-paper-snowman-craft/
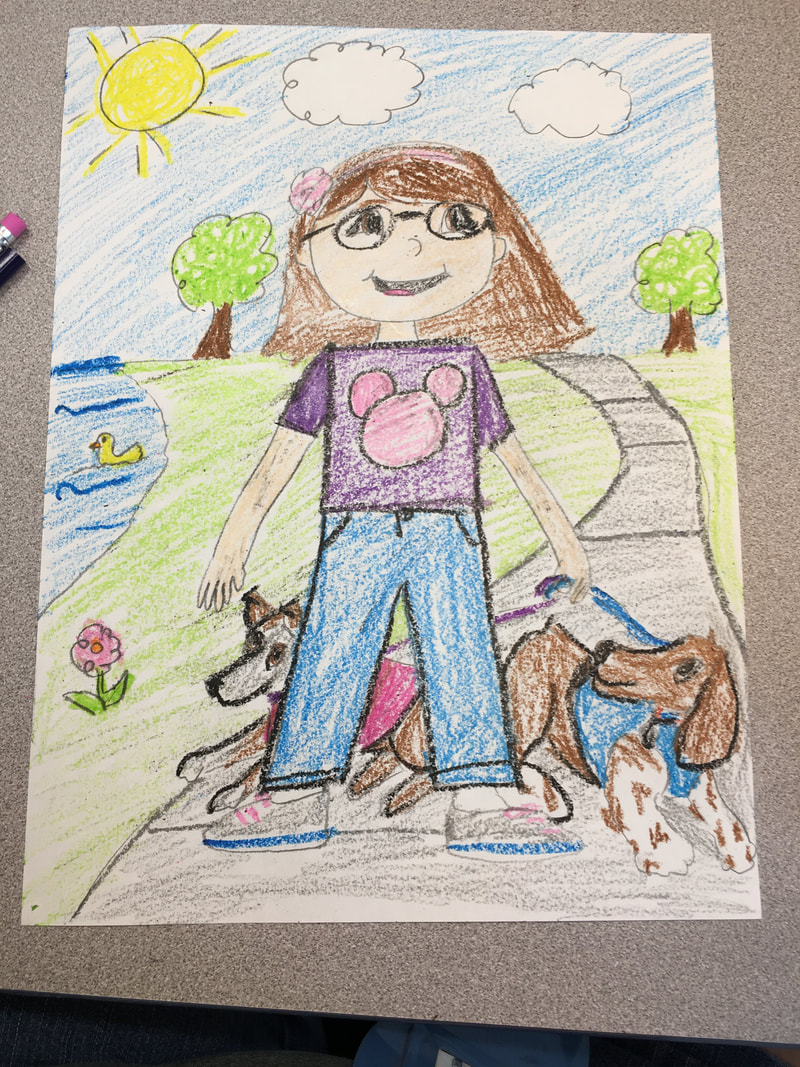
Title of Project: Family Portraits

family portrait by the Dutch Master Frans Hals the Elder

Pinterest
Pablo Picasso, 1903, La Famille Soler, oil on canvas

Content Objective:
I can learn about family portraits.
I can learn about portraits.
I can draw a figure with face, arms and legs.
I can draw a person from head to toe without sticks.
Language Objective:
I will use line and shape to create a portrait.
I will learn about the art element color talking about primary and secondary colors.
I will learn what family portrait means by drawing a picture of their family.
Materials: crayons and watercolor
Day 1 of 2
Instructional Plan:
Engaged: Discuss expressions in Faces. Explore some family portrait pictures have them tell what they see.
Explore: Explain what a family portrait is and how everyone’s family is different.
Explain: Explain how to create a person using shapes not stick figures.
Elaborate:
Students draw their family. Making sure that they can see their faces and making them look like the colors of real people. No green, blue, or red people. Humans should be brown, tan, or peach. Making sure that they think of the peoples clothing. Having the clothes in primary or secondary colors. Having each person’s cloths be different colors so they don’t blend into each other.
Draw a background outside.
Evaluate:
Talk about what they have learned. Students show their family portrait.
Day 2 of 2
Instructional Plan:
Engaged: Learn about color. Watch the color song. https://youtu.be/N8yuyekP_So
Explore: Review the color of people. Talk about where we color skin. Talk about how to color in clothes so the family members don't blend into one by creating variety in the family clothing color which will create contrast.
Explain: Explain how to use watercolors correctly to color in their people.
Elaborate:
Students draw their family. Making sure that they can see their faces and making them look like the colors of real people. No green, blue, or red people. Humans should be brown, tan, or peach. Making sure that they think of the peoples clothing. Having the clothes in primary or secondary colors. Having each person’s cloths be different colors so they don’t blend into each other.
Draw a background outside.
Evaluate:
Talk about what they have learned. Students show their family portrait.
Title of Projects: Squirrel's in Fall

|
Lesson Content Objective:
I can learn how to design that shows movement through shapes. I can learn how to create a landscape. I can learn how to relate art to everyday life. Lesson Language Objective: I will learn about shape by creating a squirrel. I will learn about warm color-scheme. I will learn about unity by making my picture look like everything goes together. Materials: crayons and watercolor Day 1 of 2 Instructional Plan: Engage: Discuss the squirrel family that lives in the trees by the art window. Talk about how they are gathering nuts for the winter. Discuss the colors of the trees and how the leaves change in fall. Read Leaf Trouble by Jonathan Emmitt (Read Aloud) -Fall Story for Kids https://youtu.be/6xwhcORTC1k Explore: Talk about a warm color scheme. How warm colors are red, yellow, and orange. Explain: Show how to draw a squirrel and fall tree. Elaborate: Students sketch their fall tree and squirrel outlining their pencil lines with black crayon so we can watercolor next art day. Evaluate: Students look at their artwork and reflect on whether they believe they have made their landscape has a warm color scheme and unity. Day 2 of 2 Instructional Plan: Engage: Review coloring in neatly and completely. Explore: Review about a warm color scheme. How warm colors are red, yellow, and orange. Explain: Show how to draw a squirrel and fall tree. Elaborate: Students sketch their fall tree and squirrel outlining their pencil lines with black crayon so we can watercolor next art day. Evaluate: Students look at their artwork and reflect on whether they believe they have made their landscape has a warm color scheme and unity. |
Title of Project: Pumpkin Shapes

Lesson Content Objective:
I can learn how to design that shows movement through shapes.
I can learn how to create a pattern by repeating shapes.
I can learn how to create a still life.
Lesson Language Objective:
I will learn about shape by repeating a pattern on my pumpkin.
I will learn about pattern and variety by arranging shapes on a pumpkin to create a design.
I will learn about unity by making my picture look like everything goes together.
Materials: Markers
Day 1 of 2
Instructional Plan:
Engage: Talk about the art principal unity. https://youtu.be/Go9Jj0iDShc
Explore: Review the art element shape and discuss how we can create a pattern on our pumpkin to create movement.
Explain: Show step by step how to create a pumpkin.
Elaborate:
Students create a pumpkin.
Students then add patterns and shapes to their pumpkin creating a pattern that has variety and movement.
Evaluate: Students look at their artwork and reflect on whether they believe they have made their pumpkins have unity.
Day 2 of 2
Instructional Plan:
Engage: Review unity and shape.
Explore: Discuss the proper way to use watercolors.
Explain: Show step by step how to paint your pumpkin. https://youtu.be/NqmUGtwpniI
Elaborate:
Students create a pumpkin.
Students then add patterns and shapes to their pumpkin creating a pattern that has unity and movement.
Evaluate: Students look at their artwork and reflect on whether they believe they have made their pumpkins have unity.
Title of Project: Spooky Tree


Lesson Content Objective:
I can learn how to create movement through line and shape.
I can learn about landscape.
I can learn how art can tell a story.
Lesson Language Objective:
I will learn about shape by painting a tree.
I will learn about narrative art by creating a movement with shape of leaves and animals.
I will learn about overlapping by painting shapes on top of shapes in a scene that shows unity.
I will learn about unity by making my picture look like everything goes together.
Materials: construction paper, glue, scissors, crayons
Day 1 of 2
Instructional Plan:
Engage: Look at fall trees talk about how when its fall and the leaves fall off the trees. Talk about how people think that trees without leaves look spooky.
Explore: Discuss animals we could put in our night landscape to tell a story. Thinking about animals that come out at night.
Explain: Show step by step how to draw a tree.
Elaborate: Students create a night sky with a full moon.
Students add a silhouette tree.
Students create fall leaves falling making it look like wind is blowing it down showing motion.
Students create animals in their picture that come out at night time.
Title of Project: Shark attack


Assignment for: weeks: Sept 21- 25 & Sept. 28- Oct. 2
Lesson Content Objective:
I can learn how to create movement through line and shape.
I can learn about seascapes.
I can learn how art can tell a story.
Lesson Language Objective:
I will learn about shape by cutting paper to form a picture.
I will learn about narrative art by creating a seascape with character with a shark.
I will learn about overlapping by collaging waves, character, and a shark in a scene that shows unity.
I will learn about unity by making my picture look like everything goes together.
Materials: construction paper, glue, scissors, crayons
Day 1 of 2
Instructional Plan:
Engage: Watch a the shape song.
Explore: Show how to create a shark step by step.
Explain: Show how to create waves.
Elaborate: Students add character on the ocean telling a story.
Day 2 of 2
Instructional Plan:
Engage: Time to climb nearpod shape quiz. https://share.nearpod.com/vsph/vyO98seuMu Nearpod code: JULMN
Explore: Show how to create a shark step by step.
Explain: Show how to create waves.
Elaborate: Students add character on the ocean telling a story. https://forms.gle/V5M2ij4kWpX7bVqa7
Title of Project: Sargent Self-Portrait
|
Lesson Content Objective(s):
I can create a composition using balance and contrast. I can construct a composition that tells a story about them. I can learn about and create a self-portrait. I can learn about facial proportions. Lesson Language Objective(s): I will learn that a portrait is a picture of a person by creating a picture of themselves. I will learn about symmetrical balance by creating a face. Vocabulary Objective: Portraits: a painting, drawing, photograph, or engraving of a person Balance: a condition in which different elements are equal or in the correct proportions Symmetrical balance: same on both sides Resources/materials: pencil, crayons Day 1 of 2 Instructional Plan: nearpod link for virtual students share.nearpod.com/vsph/7KBF2yPfMu Engage: Learn about artist John Singer Sargent. Students look at Sargent’s “A portrait of a Child” and “Garden study of the Vickers children” Compare and Contrast them and ask what does the portrait tell us about the children. Explore: Explain Symmetrical balance discus how to create a portrait with symmetrical balance. Explain: Show how to create a body with shapes and discuss how to draw a background that tells a little bit about them. Elaborate: Students create a self-portrait and a background that tells about them. Evaluate: Students add their picture to artsonia. If doing virtual add it to seesaw. Day 2 of 2 nearpod link for virtual students https://share.nearpod.com/vsph/uhbqxd17Lu Instructional Plan: Engage: Sing the line song with motions. Explore: Review Line and discuss how it creates movement. Talk about how to use crayons correctly. Explain: Discuss how to draw a background that tells a little bit about them. Elaborate: Students create a self-portrait and a background that tells about them. Evaluate: Students add their picture to artsonia. If doing virtual add it to seesaw. |
Title of Project: Ish Line Drawing

Content Objective(s):
I can learn a little bit about the art room through the Ish book
I can learn how to be kind to others in the art room.
I can learn how to draw my best.
Language Objective(s):
I will learn line by listening to the line song and tracing lines.
Resources/materials: markers
Instructional Plan:
Engage: Students click on my youtube video about what to do during this assignment https://youtu.be/Y9VyYnfxc30
Explore: https://app.nearpod.com/?pin=vhzlt&_branch_match_id=761337544689384778
In nearpod students listen to the line song then do an activity of Tracing lines to learn their names.
Explain: Students watch the Ish Book and answer simple questions about the book.forms.gle/V1DYp8uShSjjvShn8
Elaborate:
Students draw an ish drawing based on themselves.
Assessment:
Evaluate: Students add their picture to seesaw.
Title of Project: Dot
Content Objective(s):
I can learn a little bit about the art room through the Dot book
I can learn about abstract art.
I can learn different painting techniques.
Language Objective(s):
I will learn the colors of the rainbow ROY G BIV.
Resources/materials: stencil, paint, water, paint brush, scissors, tape
Instructional Plan: https://share.nearpod.com/vsph/xOSlwDgFNu
Engage: Nearpod slide show showing the directions.
Explore: Read “The Dot” by Peter Reynolds. Answer questions while watching the video through nearpod.
docs.google.com/forms/d/e/1FAIpQLSdio4ydugW2DtP1-X0580U2qSqI0Xj9wYhpLjzRoeI_LJlmVA/viewform?usp=pp_url
Explain: Watch a video while I explain how to paint an abstract dot and explain artist Jasper John, Jackson Pollock, and Alma Woodsey Thomas.
Elaborate:
Students create their own abstract dot.
Assessment:
Evaluate: Students add their picture to seesaw.
Title of Project: Getting to Know You
| directions___direcciones.pdf |
| getting_to_know_you_apron.pdf |
| getting_to_know_you_apron_with_questions.pdf |
| conociendo_tu_delantal.pdf |
| getting_to_know_you_red_hawk.pdf |
| getting_to_know_you_red_hawk_with_questions.pdf |
| _conociendo_a_red_hawk.pdf |
| kicking_of_a_new_school_year_soccer_ball.pdf |
| kicking_of_a_new_school_year_soccer_ball_with_questions.pdf |
| _iniciando_un_nuevo_año_escolar.pdf |

|
Lesson Content Objective(s): I can be able to know how to nearpod. I can learn how to submit artwork digitally. Lesson Language Objective(s): I will understand how to upload a photo file and take a picture. Resources/materials: nearpod Instructional Plan: Engage: Students watch a YouTube video about the project. Explore: Students explore the nearpod/google slide doc. https://docs.google.com/presentation/d/1qysF502JgzxYuDWFYUK0_WeSTd5jrt95gXsR9RmR4bc/edit?usp=sharing Explain: On the video I explain how to use nearpod and how to complete a project about themselves. Elaborate: Students fill out a getting to know you form about themselves. Choosing between 3 documents. Assessment: Evaluate: Students submit their form through the nearpod drawing app. |
